# Create Your First WPF Application
> Create a .NET WPF app with TextControl, button bar, rulers and status bar, declare a TXSpellChecker resource in XAML and underline misspelled words as you type.
- **Product:** TX Spell .NET for WPF
- **Section:** Documentation
- **Kind:** Topic
- **Path:** TX Spell .NET for WPF > Getting Started > TX Text Control > Create Your First WPF Application
- **2734 words**
- **Web URL:** https://docs.textcontrol.com/tx-spell-dotnet-wpf/getting-started/tx-text-control/first-application/
- **LLMs URL:** https://docs.textcontrol.com/tx-spell-dotnet-wpf/getting-started/tx-text-control/first-application/llms.txt
- **LLMs-Full URL:** https://docs.textcontrol.com/tx-spell-dotnet-wpf/getting-started/tx-text-control/first-application/llms-full.txt
---
A word processor with spell checking takes two packages and a window of XAML. You create a WPF application for .NET, add the editor of TX Text Control with a button bar, rulers and a status bar, declare the spell checker of TX Spell .NET as a resource and connect the two. Without code, misspelled words are then underlined as you type, corrected from the context menu, and words are hyphenated at the end of a line.
### Prerequisites
- Visual Studio on Windows with .NET 8 or higher.
- The setups of TX Spell .NET for WPF 11.0 and TX Text Control .NET for WPF 34.0, the full or the trial versions, installed on your machine. They provide the package source **Text Control Offline Packages**. See [Installing the Product](https://docs.textcontrol.com/tx-spell-dotnet-wpf/installation/setup/llms-full.txt).
### Create the Project
1. Open Visual Studio and create a new project.
2. Select **C#** from the **Languages** list, **Windows** from the **Platform** list and **Desktop** as the **Project Type**.
3. Select the project template **WPF Application** and click **Next**.
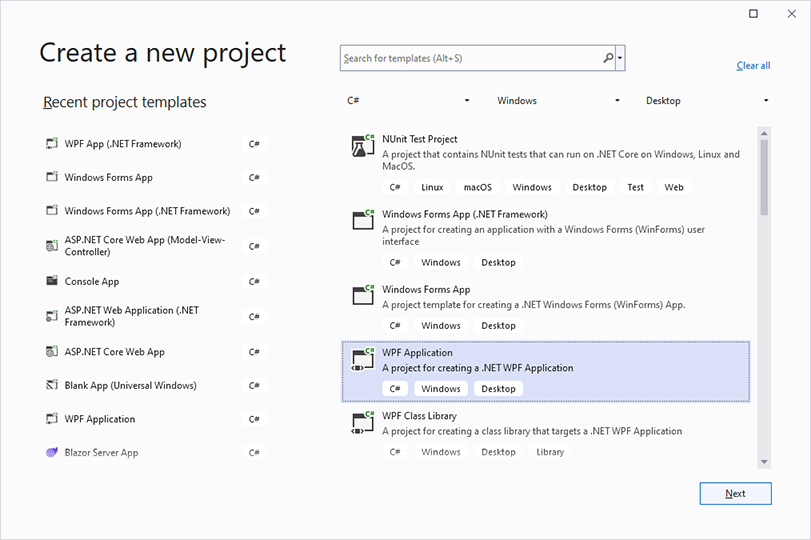
4. Enter the project name *MyWPFApp* and click **Next**.
5. Select .NET 8 or higher as the **Framework**, for example .NET 8 (Long Term Support), and click **Create**.
The template **WPF App (.NET Framework)** creates a .NET Framework project instead, which [Create a .NET Framework Application](https://docs.textcontrol.com/tx-spell-dotnet-wpf/getting-started/tx-text-control/dotnet-framework/llms-full.txt) covers.
### Install the NuGet Packages
1. Select the project in **Solution Explorer** and choose **Project** > **Manage NuGet Packages...**.
2. Select **Text Control Offline Packages** in the **Package source** list and click **Browse**.
3. Select `TXTextControl.TextControl.WPF.SDK` and click **Install**.
4. Select `TXTextControl.TXSpell.WPF.SDK` and click **Install**.
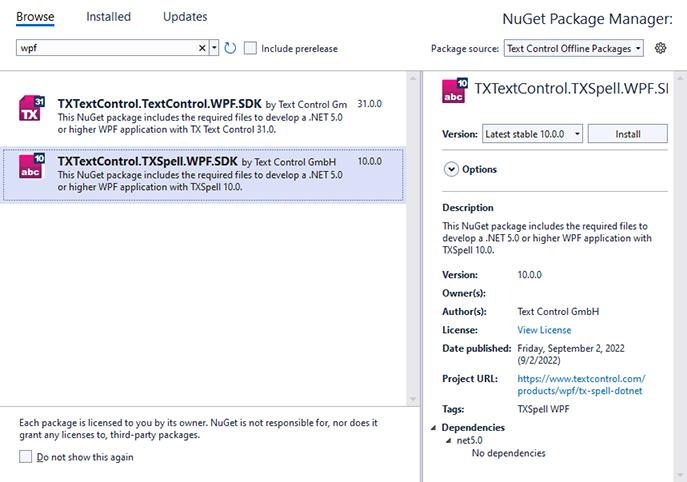
| Package | Adds |
|---|---|
| `TXTextControl.TextControl.WPF.SDK` | The `TextControl` editor, its button bar, rulers and status bar, and the license of TX Text Control |
| `TXTextControl.TXSpell.WPF.SDK` | The [TXSpellChecker](https://docs.textcontrol.com/tx-spell-dotnet-wpf/reference/txtextcontrol-wpf-proofing/txspellchecker/llms-full.txt), its dialogs, the license of TX Spell .NET, and the US English dictionary, hyphenation list and thesaurus, which it copies into the output folder when you build |
### Add the Editor to the Window
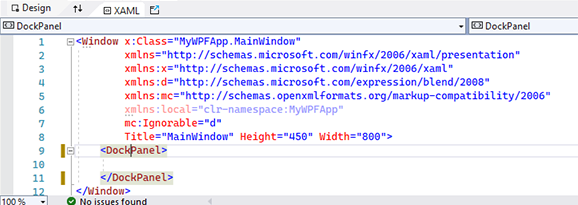
The controls of TX Text Control go into a `DockPanel`, which docks each control to one side in the order the controls appear.
1. Open *MainWindow.xaml*. In the XAML view, replace the `Grid` with a `DockPanel`:
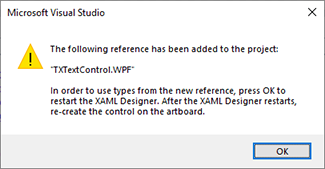
2. In the **Toolbox**, open the tab **TX Text Control 34.0** and double-click **ButtonBar** to add it to the window. For the first control of TX Text Control, Visual Studio adds a reference and asks to restart the XAML Designer. Click **OK**, then choose **Build** > **Build Solution**.
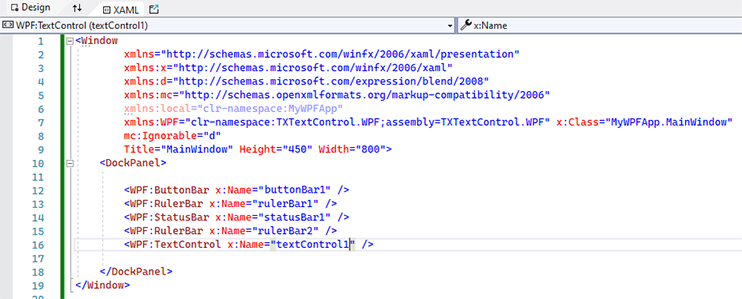
3. Select the window, not the new button bar, and add the other controls in this order: **RulerBar**, **StatusBar**, a second **RulerBar** and **TextControl**.
4. In the XAML, remove the `Height` and `Width` attributes of the added controls, and name them *buttonBar1*, *rulerBar1*, *statusBar1*, *rulerBar2* and *textControl1*:
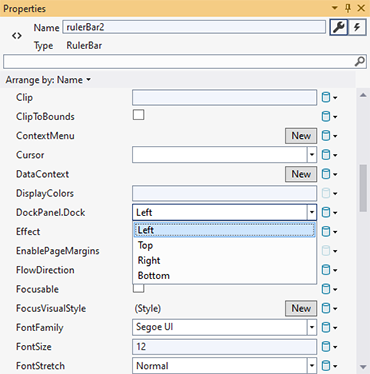
5. Select *rulerBar2* in the **Design** view. In the **Properties** window, set **DockPanel.Dock** to **Left**, **HorizontalAlignment** to **Left** and **VerticalAlignment** to **Stretch**. It becomes the vertical ruler.
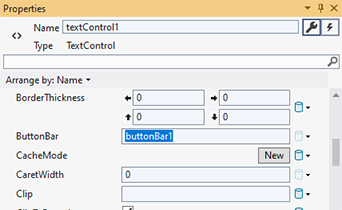
6. Select *textControl1* and connect the bars in the **Properties** window: type *buttonBar1* for **ButtonBar**, *rulerBar1* for **RulerBar**, *statusBar1* for **StatusBar** and *rulerBar2* for **VerticalRulerBar**.
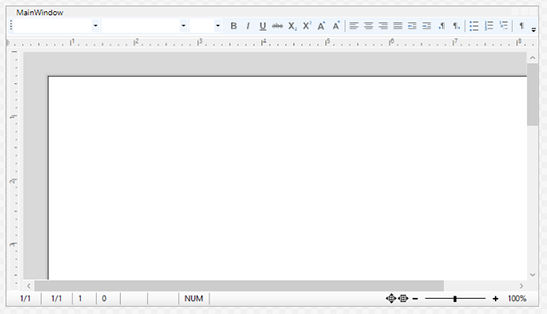
The **Design** view now shows the editor with its bars:
### Add the Spell Checker
The spell checker of TX Spell .NET for WPF is not a control in the toolbox. You declare it as a resource of the window and name its key in the `SpellChecker` property of the `TextControl`:
1. Map the namespace of TX Spell .NET to the prefix `spell` in the `Window` element.
2. Declare a `TXSpellChecker` with the key *txSpellChecker1* in `Window.Resources`.
3. Set `SpellChecker="txSpellChecker1"`, `IsSpellCheckingEnabled="True"` and, for hyphenation, `IsHyphenationEnabled="True"` on the `TextControl`.
The complete *MainWindow.xaml* looks like this. The `DockPanel.Dock` values place the bars at the top, the bottom and the left; the designer may write some of them differently, with the same result:
```xml
```
The markup works as follows:
- The prefix `WPF` maps the `TXTextControl.WPF` namespace of TX Text Control, and `spell` the `TXTextControl.WPF.Proofing` namespace of the *TXSpell.WPF* assembly.
- `` creates the spell checker as a resource of the window.
- [SpellChecker](https://docs.textcontrol.com/tx-text-control-dotnet-wpf/reference/txtextcontrol-wpf/textcontrol/spellchecker-property/llms-full.txt) holds the key of the resource as plain text, not a `{StaticResource}` markup extension: the `TextControl` looks the key up in the resources of the window itself.
- [IsSpellCheckingEnabled](https://docs.textcontrol.com/tx-text-control-dotnet-wpf/reference/txtextcontrol-wpf/textcontrol/isspellcheckingenabled-property/llms-full.txt) underlines misspelled words, and [IsHyphenationEnabled](https://docs.textcontrol.com/tx-text-control-dotnet-wpf/reference/txtextcontrol-wpf/textcontrol/ishyphenationenabled-property/llms-full.txt) hyphenates the last word of a full line with the hyphenation list of the spell checker.
- `ButtonBar`, `RulerBar`, `StatusBar` and `VerticalRulerBar` connect the bars by their names.
### Run the Application
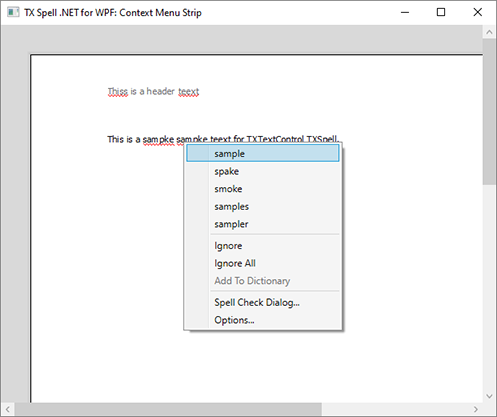
Press **F5** and type a sentence with a spelling mistake:
- Each misspelled word gets a red zigzag line once it is complete. English is checked out of the box, with the dictionary the package copied into the output folder.
- A right-click on a misspelled word opens the spell check context menu with suggestions, which also opens the spell check dialog.
- When a line is full, its last word is hyphenated with the English hyphenation list.
### Troubleshooting
- **The spell checker isn't in the toolbox.** It is declared in XAML, not taken from the toolbox. See [Toolbox and Designer](https://docs.textcontrol.com/tx-spell-dotnet-wpf/troubleshooting/toolbox/llms-full.txt).
- **No words are underlined.** Check the `SpellChecker` key and `IsSpellCheckingEnabled`. See [Spell Checking Doesn't Start](https://docs.textcontrol.com/tx-spell-dotnet-wpf/troubleshooting/toolbox/#spell-checking-doesn-t-start).
- **Text Control Offline Packages is not in the Package source list.** See [Configuring Package Sources](https://docs.textcontrol.com/tx-spell-dotnet-wpf/installation/nuget/sources/llms-full.txt).
### Next Steps
- [Correct Words from the Context Menu](https://docs.textcontrol.com/tx-spell-dotnet-wpf/getting-started/tx-text-control/context-menu/llms-full.txt): try the commands of the menu.
- [Open the Spell Check Dialog](https://docs.textcontrol.com/tx-spell-dotnet-wpf/getting-started/tx-text-control/dialog/llms-full.txt): correct the whole document in one pass.
- [As-You-Type Checking](https://docs.textcontrol.com/tx-spell-dotnet-wpf/spell-checking/as-you-type/llms-full.txt): the properties behind the underlines, and using the spell checker in code.
- [Dictionaries and Languages](https://docs.textcontrol.com/tx-spell-dotnet-wpf/dictionaries/llms-full.txt): check languages other than English.
---
## Nearby
- **Previous:** [TX Text Control](https://docs.textcontrol.com/tx-spell-dotnet-wpf/getting-started/tx-text-control/llms-full.txt)
- **Next:** [Create a .NET Framework Application](https://docs.textcontrol.com/tx-spell-dotnet-wpf/getting-started/tx-text-control/dotnet-framework/llms-full.txt)