# Create Your First WPF Application
> Create a WPF Application in Visual Studio, add TXTextControl.TextControl.WPF.SDK and add a TextControl with ButtonBar, RulerBar and StatusBar in a DockPanel.
- **Product:** TX Text Control .NET for WPF
- **Section:** Documentation
- **Kind:** Topic
- **Path:** TX Text Control .NET for WPF > Getting Started > Document Editor > Create Your First WPF Application
- **3543 words**
- **Web URL:** https://docs.textcontrol.com/tx-text-control-dotnet-wpf/getting-started/document-editor/first-application/
- **LLMs URL:** https://docs.textcontrol.com/tx-text-control-dotnet-wpf/getting-started/document-editor/first-application/llms.txt
- **LLMs-Full URL:** https://docs.textcontrol.com/tx-text-control-dotnet-wpf/getting-started/document-editor/first-application/llms-full.txt
---
A WPF window becomes a word processor when you place a `TextControl` in its XAML, together with a button bar for formatting, two rulers and a status bar. The steps below start from an empty Visual Studio project for .NET 8 or higher, add the TX Text Control NuGet package and build that window with the toolbox and the **Properties** window. One short handler at the end loads a document as soon as the editor is ready.
### Prerequisites
- Visual Studio on Windows. Version 34.0 has been tested with Visual Studio 2026. See [Visual Studio](https://docs.textcontrol.com/tx-text-control-dotnet-wpf/installation/requirements/visual-studio/llms-full.txt).
- The setup of TX Text Control .NET for WPF 34.0, the full or the trial version, installed on your development machine. It provides the package source **Text Control Offline Packages** and the toolbox items for the XAML Designer. See [Installing the Product](https://docs.textcontrol.com/tx-text-control-dotnet-wpf/installation/setup/llms-full.txt).
### Create the Project
1. Open Visual Studio and create a new project.
2. Select **C#** from the **Languages** list, **Windows** from the **Platform** list and **Desktop** as the **Project Type**.
3. Select the project template **WPF Application** and click **Next**.
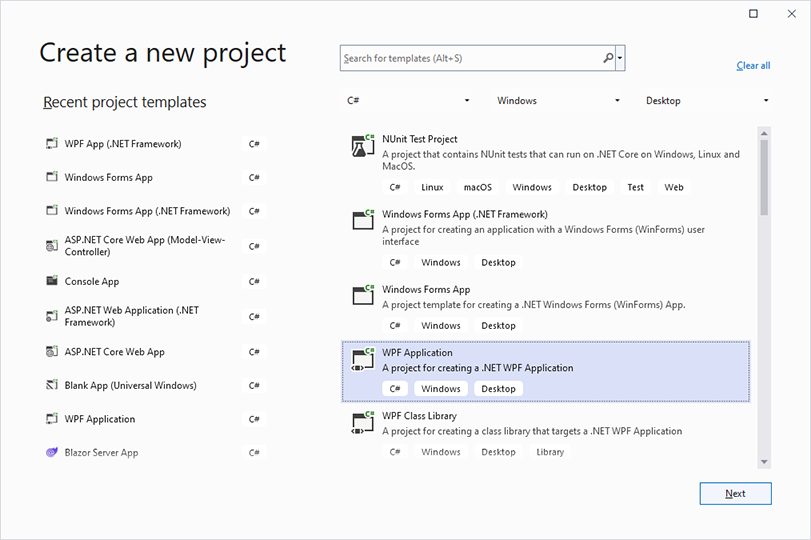
4. Enter a project name, for example *MyWPFApp*, and click **Next**.
5. Select .NET 8 or higher as the **Framework**, for example .NET 10, and click **Create**.
The template **WPF App (.NET Framework)** creates a .NET Framework project instead. [Create a .NET Framework Application](https://docs.textcontrol.com/tx-text-control-dotnet-wpf/getting-started/document-editor/dotnet-framework/llms-full.txt) covers it.
### Install the NuGet Package
1. Select the project in **Solution Explorer** and choose **Project** > **Manage NuGet Packages...**.
2. Select **Text Control Offline Packages** in the **Package source** list and click **Browse**.
3. Select `TXTextControl.TextControl.WPF.SDK` and click **Install**.
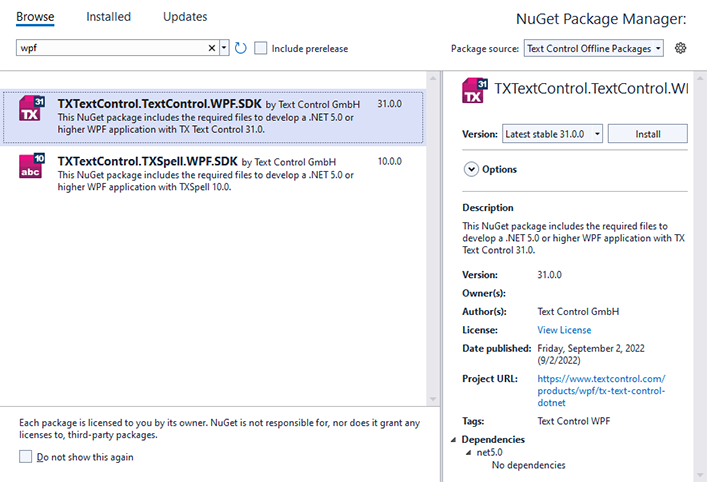
The package brings the WPF controls, the document engine and the license file of your installation into the project. When it is installed, the toolbox shows the tab **TX Text Control 34.0** while a XAML file is open:
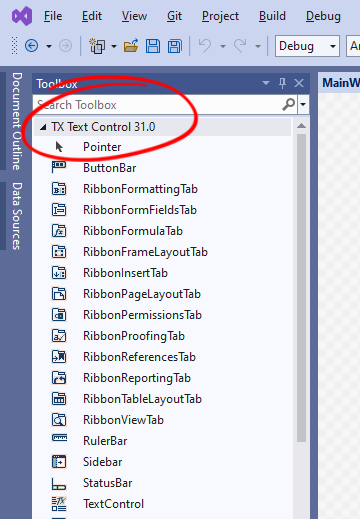
[Package Overview](https://docs.textcontrol.com/tx-text-control-dotnet-wpf/installation/nuget/packages/llms-full.txt) lists what the package contains.
### Prepare the Window
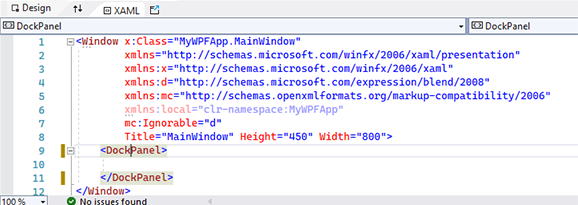
Visual Studio creates *MainWindow.xaml* with a `Grid` as the root element of the window's content. The controls of this tutorial are arranged by a `DockPanel`, which places each child at one side of the window and gives the last child the space that is left.
1. Open *MainWindow.xaml* from **Solution Explorer**.
2. In the XAML view, replace the `` and `` tags with `` and ``:
### Add the Editor and Its Bars
The order in which you add the controls decides where they appear, because the `DockPanel` arranges its children in the order of the XAML. The `TextControl` comes last, so that it fills the space the bars leave.
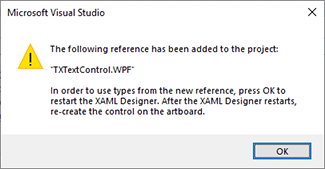
1. In the toolbox tab **TX Text Control 34.0**, double-click **ButtonBar** to add it to the window. For the first control of TX Text Control, Visual Studio adds a reference to *TXTextControl.WPF* and asks you to restart the XAML Designer. Click **OK**.
2. Choose **Build** > **Build Solution**.
3. Select the window, not the button bar you added, in the designer or in the XAML. Then double-click **RulerBar**, **StatusBar**, a second **RulerBar** and **TextControl** in this order. Select the window again before each double-click.
4. In the XAML, remove the `Height` and `Width` attributes that Visual Studio added to the new elements.
5. Name the elements `buttonBar1`, `rulerBar1`, `statusBar1`, `rulerBar2` and `textControl1`, in this order:
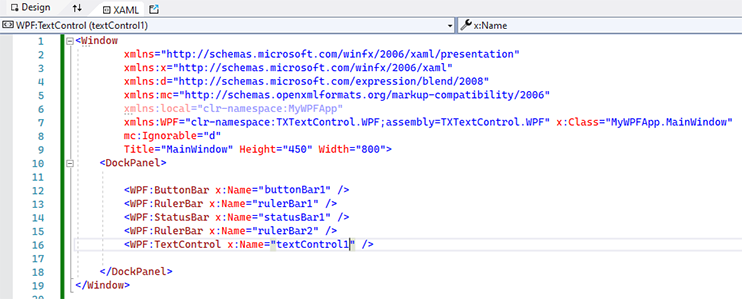
Visual Studio also added the namespace declaration `xmlns:WPF="clr-namespace:TXTextControl.WPF;assembly=TXTextControl.WPF"` to the `Window` element. The prefix `WPF` in front of each element name refers to it. [Add TextControl in XAML](https://docs.textcontrol.com/tx-text-control-dotnet-wpf/getting-started/document-editor/xaml/llms-full.txt) explains the declaration and shows how to write the XAML without the toolbox.
### Place the Vertical Ruler
The second ruler shows the vertical positions of the page and belongs at the left side of the editor.
In the XAML view of *MainWindow.xaml*, add the docking and alignment attributes to the existing `rulerBar2` element:
```xml
```
`DockPanel.Dock` is an attached property of WPF. Set it in XAML even when the **Properties** window does not list it. Keep this element before `textControl1` in the `DockPanel`.
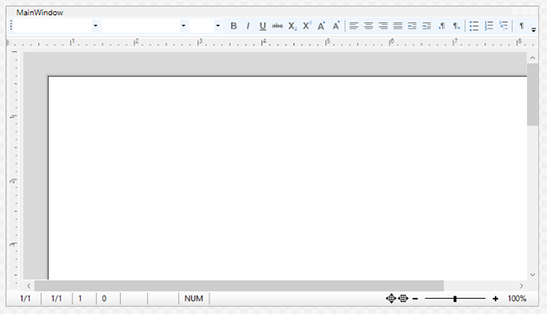
A `RulerBar` docked at the left or right of the window shows a vertical scale. The **Design** view now shows the button bar and the horizontal ruler at the top, the vertical ruler at the left and the status bar at the bottom:
### Connect the Bars to the Editor
The bars show and change the formatting of the text only when the `TextControl` knows them. It connects to each bar through a property that holds the bar's name.
1. Select `textControl1` in the **Design** view.
2. In the **Properties** window, find the **ButtonBar** property and type `buttonBar1`.
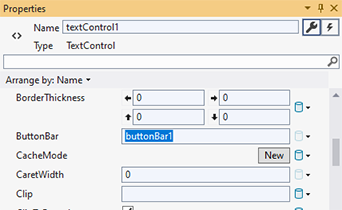
3. Set **RulerBar** to `rulerBar1`, **StatusBar** to `statusBar1` and **VerticalRulerBar** to `rulerBar2`.
The XAML of the window now reads as follows. The namespace of `x:Class` is the name of your project:
```xml
```
The attribute `Loaded="textControl1_Loaded"` is not there yet: the next section adds it.
### Load a Document When the Editor Is Ready
Code that works with the document runs in the `Loaded` event of the `TextControl`. WPF raises this event once the control has been loaded into the window; in the constructor of the window, the editor isn't ready for a document yet.
1. In the XAML, add `Loaded="textControl1_Loaded"` to the `WPF:TextControl` element, as in the XAML above.
2. Right-click `textControl1_Loaded` and choose **Go To Definition**. Visual Studio creates the handler in *MainWindow.xaml.cs*.
3. Complete *MainWindow.xaml.cs* as follows:
```csharp
using System.Windows;
using TXTextControl;
namespace MyWPFApp
{
public partial class MainWindow : Window
{
public MainWindow()
{
InitializeComponent();
}
private void textControl1_Loaded(object sender, RoutedEventArgs e)
{
// Show pages like a printed document
textControl1.ViewMode = ViewMode.PageView;
// Replace the contents with a DOCX file
textControl1.Load("document.docx", StreamType.WordprocessingML);
// Put the input focus into the editor
textControl1.Focus();
}
}
}
```
1. Copy a file named *document.docx* into the output folder of the project, such as *bin\\Debug\\net10.0-windows*, or pass its full path. DOCX files are supported by the Professional and Enterprise editions; with the Standard edition, load an RTF file with `StreamType.RichTextFormat` instead.
The code works as follows:
- `using TXTextControl;` makes the enumerations `ViewMode` and `StreamType` available. The WPF controls themselves are in the namespace `TXTextControl.WPF`.
- [ViewMode](https://docs.textcontrol.com/tx-text-control-dotnet-wpf/reference/txtextcontrol-wpf/textcontrol/viewmode-property/llms-full.txt) sets how the editor displays the document. `PageView` shows the pages with gaps between them on a background, and headers and footers as they are printed.
- [Load](https://docs.textcontrol.com/tx-text-control-dotnet-wpf/reference/txtextcontrol-wpf/textcontrol/load-method/llms-full.txt) replaces the complete contents of the editor with the file. [StreamType](https://docs.textcontrol.com/tx-text-control-dotnet-wpf/reference/txtextcontrol/streamtype/enumeration/llms-full.txt)`.WordprocessingML` is the DOCX format.
- `Focus` is a method of WPF: it moves the keyboard focus into the editor, so that the user can type at once.
### Run the Application
Press **F5**. The window shows a word processor:
- The button bar at the top with the style, the font and the font size, buttons for bold, italic, underline and other character attributes, alignment, indents and lists.
- A horizontal ruler with the margins, indents and tabs of the current paragraph, and a vertical ruler at the left.
- The document from *document.docx* in page view.
- A status bar with the section, the page, the line and the column of the input position and a zoom slider.
Select some text and click a button of the button bar, or drag an indent marker of the ruler: the text changes, and the bars show the attributes of the text at the input position. Resize the window, and the editor and its bars follow.
### Troubleshooting
- **The toolbox has no tab TX Text Control 34.0.** The tab appears in a .NET project after the package is installed from **Text Control Offline Packages** and a XAML file is open. See [Visual Studio Toolbox and XAML Designer](https://docs.textcontrol.com/tx-text-control-dotnet-wpf/installation/toolbox/llms-full.txt).
- **The bars don't react to the text.** A name in **ButtonBar**, **RulerBar**, **VerticalRulerBar** or **StatusBar** doesn't match the name of the bar. See [Toolbox and XAML Designer](https://docs.textcontrol.com/tx-text-control-dotnet-wpf/troubleshooting/toolbox/#the-bars-aren-t-connected-to-the-editor).
- **The document isn't loaded.** Code in the constructor of the window runs before the editor is ready. Keep it in the `Loaded` handler, as [Control Initialization](https://docs.textcontrol.com/tx-text-control-dotnet-wpf/troubleshooting/initialization/llms-full.txt) describes.
- **Text Control Offline Packages isn't in the list.** See [Configuring Package Sources](https://docs.textcontrol.com/tx-text-control-dotnet-wpf/installation/nuget/sources/llms-full.txt).
### Next Steps
- [Add TextControl in XAML](https://docs.textcontrol.com/tx-text-control-dotnet-wpf/getting-started/document-editor/xaml/llms-full.txt): the namespace declaration, properties and events of the editor in XAML.
- [Connect Rulers, Toolbars, and a Status Bar](https://docs.textcontrol.com/tx-text-control-dotnet-wpf/getting-started/document-editor/rulers-toolbars/llms-full.txt): choose the buttons of the button bar and what the status bar and the rulers show.
- [Create a WPF Ribbon Application](https://docs.textcontrol.com/tx-text-control-dotnet-wpf/getting-started/document-editor/ribbon/llms-full.txt): the same editor with ribbon tabs instead of the button bar.
- [Load and Save Documents](https://docs.textcontrol.com/tx-text-control-dotnet-wpf/getting-started/document-editor/load-save/llms-full.txt): open and save documents from a menu, with and without dialog boxes.
---
## Nearby
- **Previous:** [Document Editor](https://docs.textcontrol.com/tx-text-control-dotnet-wpf/getting-started/document-editor/llms-full.txt)
- **Next:** [Create a .NET Framework Application](https://docs.textcontrol.com/tx-text-control-dotnet-wpf/getting-started/document-editor/dotnet-framework/llms-full.txt)