TX Text Control .NET is shipped with separate sets of distributable files developed and compiled for 32-bit and 64-bit processors.
It is also possible to create an AnyCPU build, if the correct set of distributable files is deployed.
In Visual Studio, a new project is automatically created for 'Any CPU'. When loading a .NET assembly, the .NET Framework decides which version of the CLR (Common Language Runtime) must be loaded based on the assembly type. System processes based on assemblies compiled for 'Any CPU' will load in the native CLR for the host system, so which files need to be deployed depends on the host's bitness in this case.
All TX Text Control sample programs come with a project file containing x86 and x64 build configurations. More information how to deploy your application is contained in each product's chapter.
The following steps explain how to create two different build configurations in Visual Studio.
1. Create a new Visual Studio project.
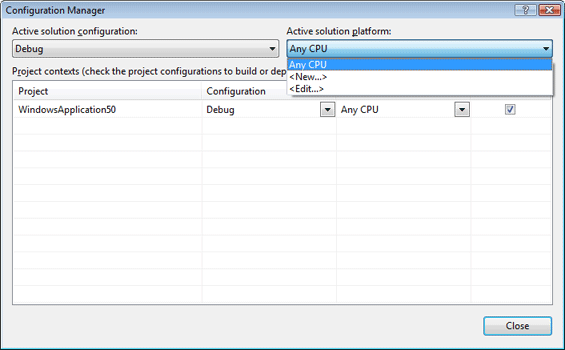
2. Open the Configuration Manager dialog by choosing Configuration Manager from the Build main menu.

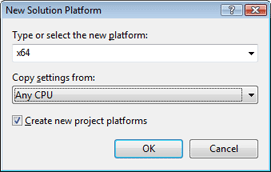
3. Select the <New...> item from the Active solution platform dropdown box to open the New Solution Platform dialog.

4. Confirm the settings in the dialog by clicking OK. A new configuration for x64 is created.
5. Repeat step 3 and 4 for an x86 configuration. The Active solution platform dropdown box of the Configuration Manager dialog box should now look like this:

6. Select <Edit...> from the dropdown box to open the edit Solution Platforms dialog.
7. Select Any CPU and click Remove to remove this configuration.
8. Close both dialogs by clicking Close.
The Solution Platform dropdown box of Visual Studio should now look like this:

To compile your application for a specific processor, choose the appropriate platform from this toolbox.