
Template Design
Designing a template starts with the data, not with the layout: the names of the merge fields and merge blocks must be the names of the data you merge later. With sample data of the right structure, you design a template in the template editor of the ReportingCloud portal that fits your application's data before the application sends any. The walkthrough below turns .NET classes into sample data, designs an invoice template for them and merges it.
The editor itself is described in Template Editor, and the sample data it works with in Datasource Excerpts. The elements of a template have pages of their own: Merge Fields, Merge Blocks, Images and Conditional Blocks.
How a Template Fits Its Data
A template contains the layout of the document and the names of its merge fields and merge blocks, never the data. The names connect the two: a merge field is named like a value of a record, such as InvoiceNumber, and a merge block like an array, such as Items, as Merge Data describes. A template therefore works with any data of the same structure.
You design it against sample data: data with the structure and the names of the real data and made-up values. In the portal, sample data is a datasource excerpt, which fills the lists and the merge preview of the template editor and is never sent with a merge request.
Where Templates Come From
| Source | What you do | Described in |
|---|---|---|
| The template editor of the portal | Create a template with New Template..., open it with a datasource excerpt and insert fields, blocks and image placeholders from the ribbon | Template Editor |
| MS Word or another word processor that supports MS Word formats | Design the document, add merge fields named like the data, save it as DOCX, DOC or RTF and upload it to the template storage | Template Storage, Managing Templates |
| The Sample Template Gallery of the portal | Copy a sample template and its sample data source to your storage with Add to My Templates and change it | Template Storage |
The template storage takes templates in the formats RTF, DOC, DOCX and TX. A template doesn't have to be stored: a merge request can also send it in the template property of the MergeBody, as Overview explains.
Prepare Sample Data From .NET Classes
When your application merges .NET objects, serialize instances of the same classes, filled with sample values, and the sample data has the structure and the names of your classes. The following console application describes an invoice with a customer and a list of products:
Create a console application and add the package
Newtonsoft.Json:dotnet new console InvoiceExcerpt cd InvoiceExcerpt dotnet add package Newtonsoft.JsonReplace the content of Program.cs with the following code:
using Newtonsoft.Json;

List<Invoice> invoices = new List<Invoice>
{
    new Invoice
    {
        InvoiceNumber = "I778977622",
        Customer = new Customer
        {
            Name = "Peter Thiel",
            Street = "123 Microsoft Way",
            Zip = 22282,
            City = "Charlotte"
        },
        Items = new List<Product>
        {
            new Product { Name = "Product 1", Description = "Product 1 Description" },
            new Product { Name = "Product 2", Description = "Product 2 Description" }
        }
    }
};

// An array of records, the format the editor and document/merge expect
string json = JsonConvert.SerializeObject(invoices, Formatting.Indented);

File.WriteAllText("invoice_data.json", json);
Console.WriteLine(json);

public class Invoice
{
    public string? InvoiceNumber { get; set; }
    public Customer? Customer { get; set; }
    public List<Product>? Items { get; set; }
}

public class Customer
{
    public string? Name { get; set; }
    public string? Street { get; set; }
    public int Zip { get; set; }
    public string? City { get; set; }
}

public class Product
{
    public string? Name { get; set; }
    public string? Description { get; set; }
}
Run it with
dotnet run. It prints the JSON and saves it as invoice_data.json.
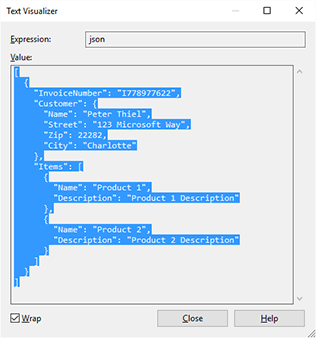
The list of invoices becomes a JSON array with one record. Customer becomes a nested object and Items an array of two products. In Visual Studio, you can also stop at a breakpoint after SerializeObject and copy the string from the Text Visualizer:
Create the Datasource Excerpt
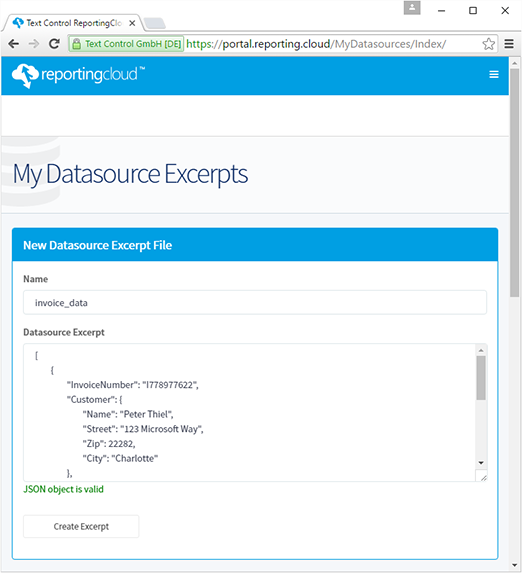
Log in to the portal and open My Datasource Excerpts.
Enter a name, such as invoice_data, and paste the JSON into Datasource Excerpt. The form confirms valid JSON with "JSON object is valid". Save the excerpt with Create Excerpt.
Design the Invoice Template
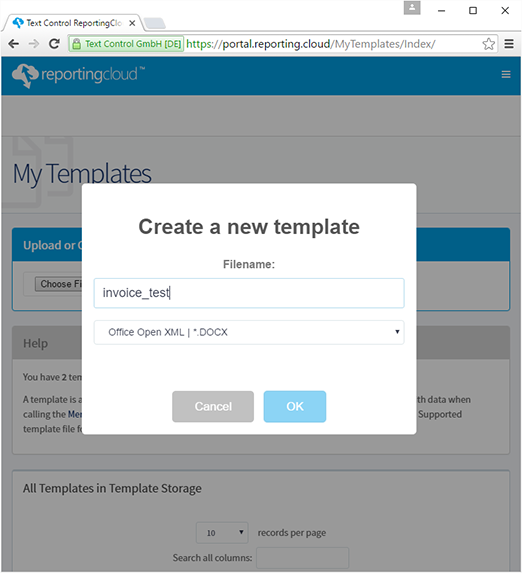
Open My Templates and choose New Template.... Type a name such as invoice_test, choose a format such as DOCX and confirm with OK.
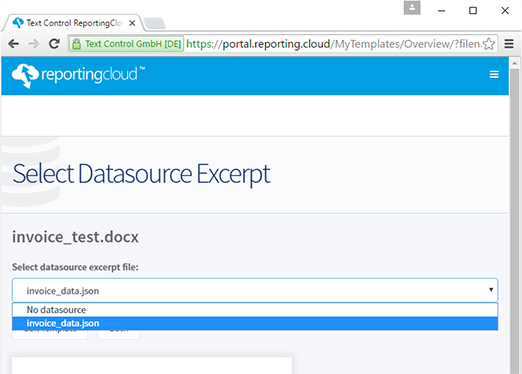
In the next dialog, click Edit Template. Choose invoice_data.json in the drop-down list of datasource excerpts and confirm with Edit Template.
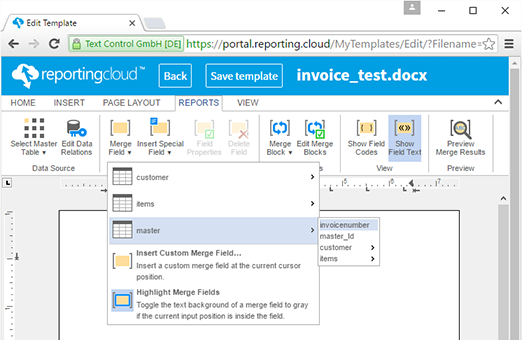
The editor opens. On the Reporting tab, open the Merge Field drop-down, point to master and choose invoicenumber. The drop-down lists the excerpt as the tables master, customer and items, with all names in lowercase.
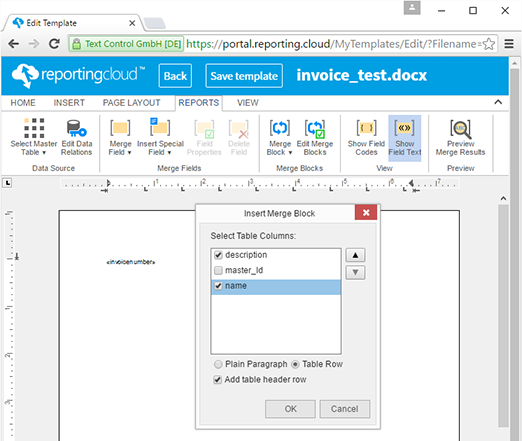
Insert some blank lines after the field. Then open Merge Block and choose items. In the Insert Merge Block dialog, check description and name, keep Table Row and Add table header row selected and confirm with OK.
The editor inserts a table with a header row and a row for the block, marked in red. The row is repeated for each element of
Items: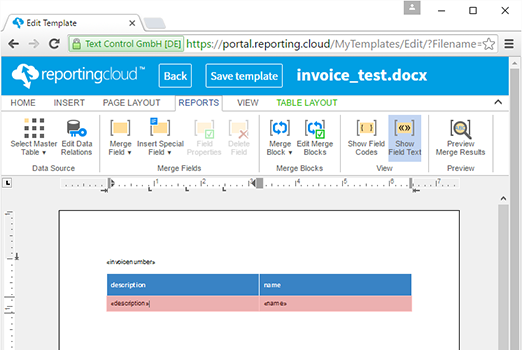
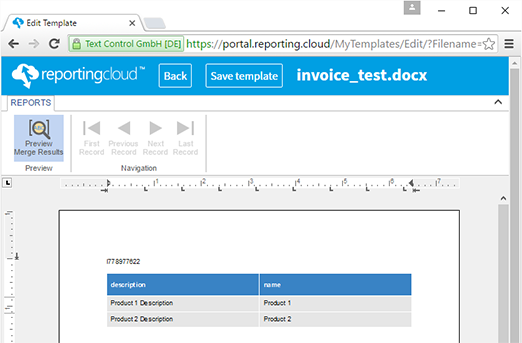
Click Preview Merge Results in the Preview group and confirm the dialog box with OK. The preview merges the excerpt: the invoice number and one table row for each product:
Finish the design, save it with Save template and return to the dashboard with Back.
Merge the Template
The JSON of the excerpt is valid merge data, so the template can be merged with it right away. The merge matches names without regard to letter case, so the lowercase fields and blocks of the editor receive the values of InvoiceNumber and Items, as Merge Fields explains. In your application, the same structure comes from the list of Invoice objects. The following commands merge invoice_test.docx with invoice_data.json:
# Wrap the records of the sample data in a MergeBody
jq '{mergeData: .}' invoice_data.json > merge.json
curl POST "https://api.reporting.cloud/v1/document/merge?templateName=invoice_test.docx&returnFormat=PDF" \
"Authorization: ReportingCloud-APIKey $REPORTINGCLOUD_API_KEY" \
"Content-Type: application/json" \
@merge.json \
result.json
jq '.[0]' result.json | base64 > invoice.pdf
The commands are those of the Overview, with the template and the data of this walkthrough. The API key comes from the environment variable REPORTINGCLOUD_API_KEY, as API Keys explains.
Use the Fonts of ReportingCloud
A template can use every font that is installed on the ReportingCloud servers: Windows fonts, such as Arial, Calibri and Times New Roman, and many Google Fonts, but not every Google Font. Inter, Roboto Condensed, Roboto Mono and Ubuntu, for example, are missing. The template editor lists the available fonts in the font drop-down of the Home tab, and documents merged with the Web API are rendered with the same fonts as the editor.
A template designed in MS Word can use fonts that ReportingCloud doesn't have. Before you upload such a template, check its fonts against the list that GET /v1/fonts/list returns as a JSON array of font names:
curl "Authorization: ReportingCloud-APIKey $REPORTINGCLOUD_API_KEY" \
https://api.reporting.cloud/v1/fonts/list \
fonts.json
# Prints true when the font is available
jq 'any(.[]; rtrimstr(" ") == "Arial")' fonts.json
Four names of the list end with a space, such as "Pompiere ", so the command compares each name without it. The .NET SDK returns the same list with ListFonts, and the PHP SDK with getFontList, which trims the names.
Next Steps
- Template Editor: the ribbon, the dialogs and the preview of the editor.
- Merge Blocks: repeat rows and sections for each element of an array.
- Nested Blocks: design blocks inside blocks.
- Merge Settings: control how empty fields, blocks and images are handled.