
React
The DocumentViewer component of the npm package @txtextcontrol/tx-react-ds-document-viewer displays documents in a React application. It requests an access token from DS Server, loads the viewer from there and shows the document you pass as a property. Starting from an empty Vite project, you prepare a security profile, add the component and load another document with the JavaScript API.
Prerequisites
- Node.js and npm, and an editor such as Visual Studio Code.
- A DS Server that is installed, licensed and reachable from the browser, as the Installation Guide and Licensing describe. The samples use
http://localhost:5000. With a trial token instead, skip the next section, usehttps://trial.dsserver.ioas the service URL and the client ID and secret of the token; see Trial Token.
The package requires React 19 and DS Server 5.0 or later.
Prepare a Security Profile
With a client ID and secret, the component requests its token from the browser with the client credentials grant type, which the security profile must allow. If you created a profile for the Document Editor in React, use it. Otherwise:
In the admin portal of DS Server, choose Security Profiles, click + Create new profile, enter a name and click Create.
Copy the Client ID and the Client Secret of the new profile.
Switch on Allow "Client Credentials" grant type, which is off by default, and click Done.
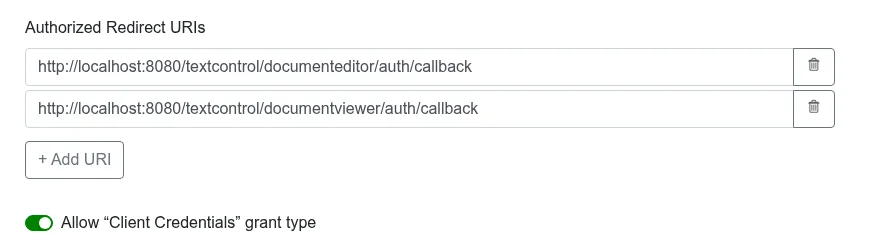
Credentials in the JavaScript of a page are visible to its visitors. Use them for development; in production, pass a token your server requested to the accessToken property, as Use an Access Token shows.
Create the React Application
Open a command prompt and create a new React application with Vite:
npm create vite@latest my-ds-viewer-appSelect React as the framework and JavaScript as the variant, and choose a linter. Answer No to Install with npm and start now?, because the next step installs the dependencies.
Change to the new folder and install the dependencies:
cd my-ds-viewer-app
npm install
Install the Document Viewer package:
npm i @txtextcontrol/tx-react-ds-document-viewer
Add the Viewer Component
Open src/App.jsx, replace its complete content with the following code and save the file. Replace the service URL, the client ID and the client secret with your values.
import DocumentViewerPackage from '@txtextcontrol/tx-react-ds-document-viewer';

// Vite 8 returns the CommonJS module for a default import
const DocumentViewer = DocumentViewerPackage.default ?? DocumentViewerPackage;

function App() {
  return (
    <DocumentViewer
      width="1000px"
      height="600px"
      serviceURL="http://localhost:5000"
      clientId="<client ID>"
      clientSecret="<client secret>"
      documentData="SGVsbG8gdGhlcmU="
      documentPath="hello.txt"
    />
  );
}

export default App;
What the Code Does
- The package is a CommonJS module, and under Vite 8 the default import returns the whole module object. The code takes the component from its
defaultproperty and falls back to the import itself for earlier Vite versions. widthandheightset the size of the viewer, andserviceURLis the address of DS Server.clientIdandclientSecretare the credentials of the security profile. Unlike the editor, the viewer takes them as separate properties, not in anauthSettingsobject. The README of the package spells the first oneclientID, but the component readsclientId.documentDatais the document as a Base64-encoded string, here the text "Hello there", anddocumentPaththe name the viewer displays.
React in Client-Side Libraries lists every property, including dock, showThumbnailPane and the signatureSettings for a signing process.
Run the Application
In the command prompt, start the development server:
npm run devOpen the address it prints,
http://localhost:5173by default, in your browser.
The page shows the Document Viewer with its toolbar, the thumbnail pane and the text "Hello there".
Load a Document With the JavaScript API
The onLoad property runs a function when the viewer script is loaded and the global TXDocumentViewer object exists. The following version of src/App.jsx adds a button that replaces the displayed document with loadDocument:
import DocumentViewerPackage from '@txtextcontrol/tx-react-ds-document-viewer';

// Vite 8 returns the CommonJS module for a default import
const DocumentViewer = DocumentViewerPackage.default ?? DocumentViewerPackage;

function App() {
  function handleLoad() {
    console.log('The TXDocumentViewer object exists from now on.');
  }

  function loadWelcome() {
    TXDocumentViewer.loadDocument(btoa('<strong>Welcome to DS Server</strong>'), 'welcome.html');
  }

  return (
    <>
      <button onClick={loadWelcome}>Load Document</button>
      <DocumentViewer
        width="1000px"
        height="600px"
        serviceURL="http://localhost:5000"
        clientId="<client ID>"
        clientSecret="<client secret>"
        documentData="SGVsbG8gdGhlcmU="
        documentPath="hello.txt"
        onLoad={handleLoad}
      />
    </>
  );
}

export default App;
loadDocument takes the document as a Base64-encoded string and the document name for the status bar.
Use an Access Token
To keep the client secret on your server, request the token there and pass it to the accessToken property instead of clientId and clientSecret. Render the component only after the token has arrived. Replace https://localhost:7143/api/token with the address of your token endpoint:
import { useEffect, useState } from 'react';
import DocumentViewerPackage from '@txtextcontrol/tx-react-ds-document-viewer';

// Vite 8 returns the CommonJS module for a default import
const DocumentViewer = DocumentViewerPackage.default ?? DocumentViewerPackage;

function App() {
  const [accessToken, setAccessToken] = useState(null);

  useEffect(() => {
    // request the access token from your own backend
    fetch('https://localhost:7143/api/token')
      .then(response => response.json())
      .then(token => setAccessToken(token.access_token));
  }, []);

  if (!accessToken) {
    return null;
  }

  return (
    <DocumentViewer
      width="1000px"
      height="600px"
      serviceURL="http://localhost:5000"
      accessToken={accessToken}
      documentData="SGVsbG8gdGhlcmU="
    />
  );
}

export default App;
Keep the Client Secret on Your Server shows an ASP.NET Core endpoint that returns the token. The Vite development server runs on another origin, so the endpoint must allow it with a CORS policy, and it must be protected, because it gives a token to anyone who calls it.
Troubleshooting
- "Element type is invalid" in the browser console: the plain default import returned the module object. Take the component from
default, as the code above does. - "DS Server is not registered." On a DS Server without a license, this message appears in red at the top of the page instead of the viewer. Register the server in the admin portal, as Licensing describes.
Could not retrieve OAuth token. Error: unsupported_grant_typein the browser console: the security profile doesn't allow the client credentials grant type.
Document Editor and Viewer in Troubleshooting covers more problems.
Next Steps
- React: every property of the viewer component and its signature settings.
- Document Viewer JavaScript API: annotations, forms, signatures and events.
- Document Editor in React: edit documents in the same application.
- Supported File Formats: the formats the viewer displays.