
ASP.NET Core
In an ASP.NET Core MVC application, the NuGet package TXTextControl.DocumentServices.DocumentViewer adds the Document Viewer of DS Server to a Razor view. DS Server renders the document, and the browser displays it with a toolbar, page thumbnails, text search, annotations and signature fields. You create a security profile, build the application, register its redirect URI and pass a document to the viewer from C#.
Prerequisites
- Visual Studio 2026 with the .NET 10 SDK. The package targets .NET 8 and .NET 10.
- A DS Server that is installed, licensed and reachable from your development machine, as the Installation Guide and Licensing describe. The samples use
http://localhost:5000. - Access to the admin portal of that DS Server.
With a trial token instead of your own server, skip the security profile and read Use a Trial Token below. Trial Token explains how to get one.
Create a Security Profile
The viewer gets its access token for a security profile, the client ID and client secret the admin creates for an application. If you already created a profile for the Document Editor tutorial, use it and continue with the next section.
Open the admin portal of DS Server and sign in as the admin.
Choose Security Profiles from the main menu and click + Create new profile.
Enter a name for the profile, such as MyViewerProject, and click Create.
Copy the Client ID and the Client Secret that the Edit Security Profile page shows, then click Done.
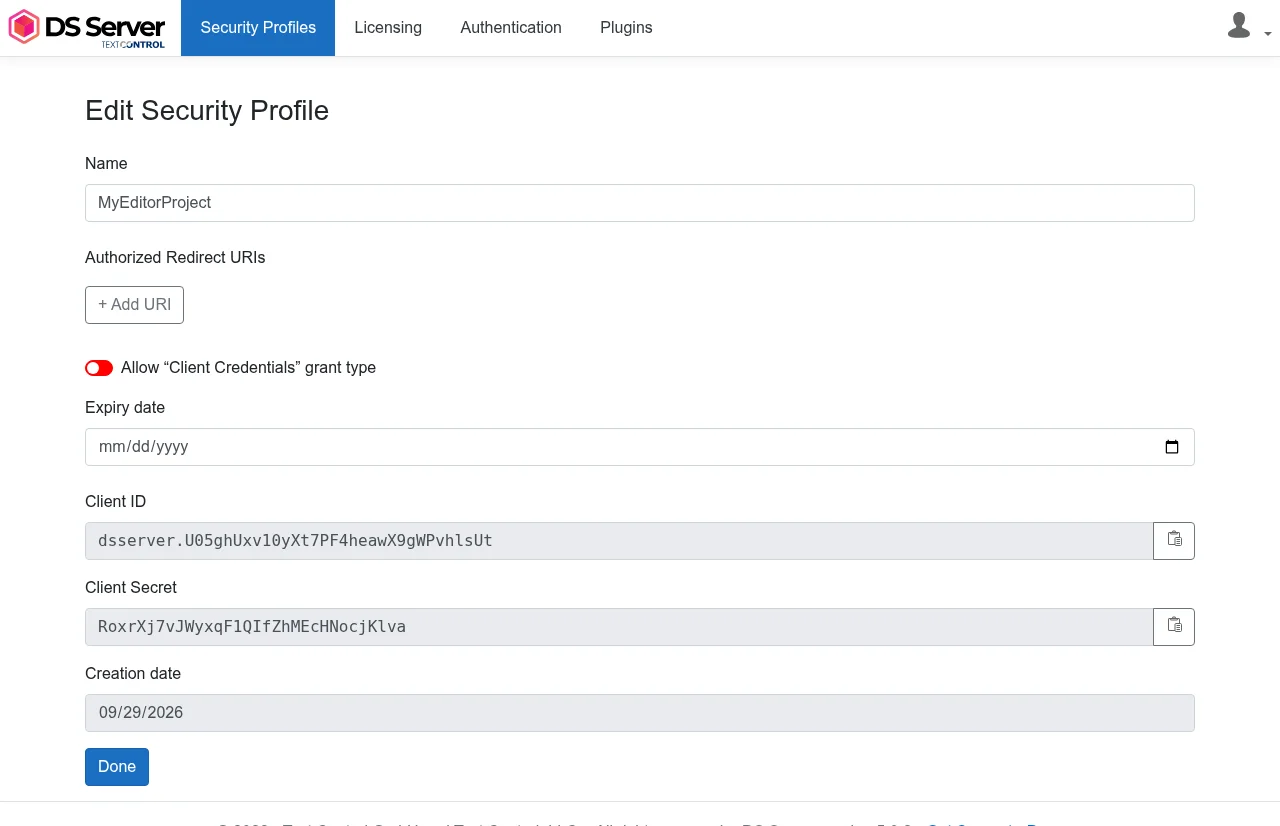
Creating Security Profiles describes the profile settings.
Create the Project
- In Visual Studio 2026, choose Create a new project.
- Select ASP.NET Core Web App (Model-View-Controller) as the project template and confirm with Next.
- Enter a project name, choose a location and confirm with Next.
- Choose .NET 10.0 (Long Term Support) as the Framework and create the project.
With the .NET CLI, create the project and change to its folder:
dotnet new mvc MyViewerApp net10.0
cd MyViewerApp
Install the NuGet Package
- In Solution Explorer, select your project and choose Manage NuGet Packages... from the Project menu.
- Select nuget.org as the package source.
- Search for
TXTextControl.DocumentServices.DocumentViewerand install version 5.0.0, the version for DS Server 5.0.
With the .NET CLI, run this command in the project folder:
dotnet add package TXTextControl.DocumentServices.DocumentViewer
Program.cs stays as the template created it.
Add the Viewer to the View
Open Index.cshtml in the Views/Home folder and replace its complete content with the following code. Replace the service URL, the client ID and the client secret with your values, and https://localhost:7143 with the HTTPS address of your project from Properties/launchSettings.json.
@using TXTextControl.DocumentServices.DocumentViewer
@using System.Text

<div style="width: 1000px; height: 600px;">

@await Html.TXTextControl().DocumentViewer(settings => {
    settings.DocumentData = Convert.ToBase64String(
        Encoding.UTF8.GetBytes("<strong>Welcome to DS Server</strong>"));
    settings.Dock = DocumentViewerSettings.DockStyle.Fill;
    settings.BasePath = "http://localhost:5000";
    settings.OAuthSettings.ClientId = "<client ID>";
    settings.OAuthSettings.ClientSecret = "<client secret>";
    settings.OAuthSettings.RedirectUri = "https://localhost:7143/textcontrol/documentviewer/auth/callback";
}).RenderAsync()

</div>
What the View Does
@using TXTextControl.DocumentServices.DocumentViewerimports the namespace of the HTML helper and ofDocumentViewerSettings.Html.TXTextControl().DocumentViewer()creates the viewer with the settings of the lambda expression, andRenderAsync()writes it into the page.DocumentDatais the document to display as a Base64-encoded string. Here, it is a short HTML string.Dockset toDockStyle.Fillmakes the viewer fill the surroundingdivelement of 1000 by 600 pixels.DockStyle.Windowwould fill the browser window.BasePathis the address of DS Server. The viewer's property has a different name than the editor'sServiceUrl, but the value is the same. The browser loads the viewer scripts from this address, so it must be reachable from the browser.OAuthSettingsholds the credentials of the security profile. WithRedirectUri, the package requests the access token with the authorization code flow on your server. The page receives the access token and a refresh token, but not the client secret.
Register the Redirect URI
Start the application with F5 or dotnet run. Until the security profile lists the redirect URI, the page shows this message in place of the viewer:
Authorization Error
Exception: OAuth access token request failed. Missing, invalid or mismatching redirection URI.
In the admin portal, choose Security Profiles and click the edit icon (Edit profile) of your profile.
Click + Add URI and enter the HTTPS address of your project followed by
/textcontrol/documentviewer/auth/callback, the same value asRedirectUri:https://localhost:7143/textcontrol/documentviewer/auth/callback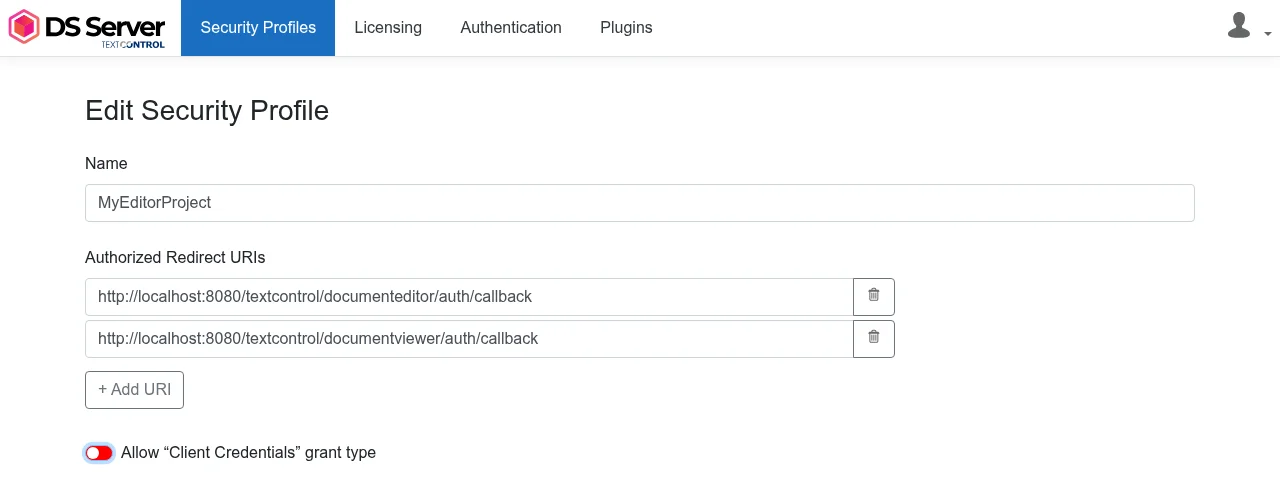
Click Save.
The Document Editor and the Document Viewer use different callback paths. A profile shared by both lists one URI for each.
Run the Application
Refresh the page. The Home view shows the Document Viewer with its toolbar, the thumbnail pane and a page with the text "Welcome to DS Server".
Load a Document From a File
To display a real document, create a folder named App_Data in the project's root folder, copy a document such as template.docx into it and pass its bytes to DocumentData. DocumentPath sets the file name that the viewer displays. In Index.cshtml, replace the div element and its content with the following code:
@{
    byte[] document = System.IO.File.ReadAllBytes("App_Data/template.docx");
}

<div style="width: 1000px; height: 600px;">

@await Html.TXTextControl().DocumentViewer(settings => {
    settings.DocumentData = Convert.ToBase64String(document);
    settings.DocumentPath = "template.docx";
    settings.Dock = DocumentViewerSettings.DockStyle.Fill;
    settings.BasePath = "http://localhost:5000";
    settings.OAuthSettings.ClientId = "<client ID>";
    settings.OAuthSettings.ClientSecret = "<client secret>";
    settings.OAuthSettings.RedirectUri = "https://localhost:7143/textcontrol/documentviewer/auth/callback";
}).RenderAsync()

</div>
In a real application, a controller usually loads the document, for example from a database, and passes it to the view in the view model. Supported File Formats lists the formats DS Server loads.
Use the JavaScript API
In the browser, the viewer is controlled with the TXDocumentViewer object. For example, loadDocument replaces the displayed document with a Base64-encoded document and takes the displayed document name as its second parameter. Add a button and a script below the div element:
<input type="button" onclick="loadWelcome()" value="Load Document" />

<script>
    function loadWelcome() {
        TXDocumentViewer.loadDocument(btoa("<strong>Loaded with JavaScript</strong>"), "welcome.html");
    }
</script>
Use a Trial Token
With a trial token, leave out RedirectUri and set BasePath to the trial server https://trial.dsserver.io:
@using TXTextControl.DocumentServices.DocumentViewer

<div style="width: 1000px; height: 600px;">

@await Html.TXTextControl().DocumentViewer(settings => {
    settings.DocumentData = "SGVsbG8gdGhlcmU=";
    settings.Dock = DocumentViewerSettings.DockStyle.Fill;
    settings.BasePath = "https://trial.dsserver.io";
    settings.OAuthSettings.ClientId = "<client ID>";
    settings.OAuthSettings.ClientSecret = "<client secret>";
}).RenderAsync()

</div>
Without RedirectUri, the package requests the token with the client credentials grant type on your server. The trial profile allows it. With your own DS Server, the security profile needs Allow "Client Credentials" grant type switched on for this variant, as OAuth Grant Types describes. SGVsbG8gdGhlcmU= is the text "Hello there".
Troubleshooting
"DS Server is not registered." On a DS Server without a license, the page shows this message in red instead of the viewer. Register the server in the admin portal, as Licensing describes.

"Authorization Error" with
unsupported_grant_type: the code has noRedirectUri, and the security profile doesn't allow the client credentials grant type. AddRedirectUrior switch the grant type on."Authorization Error" with
The SSL connection could not be established: during the authorization code flow, the package calls the HTTPS callback address of your own application, and your machine doesn't trust the ASP.NET Core development certificate. Trust it withdotnet dev-certs https --trust.
Document Editor and Viewer in Troubleshooting covers more problems.
Next Steps
- ASP.NET Core: every setting of the viewer package, including the signature settings.
- Document Viewer JavaScript API: annotations, forms, signatures and events.
- Document Editor in ASP.NET Core: edit documents with the same security profile.
- Supported File Formats: the formats the viewer displays.