
ASP.NET Core
An ASP.NET Core MVC web application needs no separate backend for the Document Viewer, because the viewer and its backend run in the same project. You install the NuGet packages, add the viewer to a Razor view, load a document from a string or a file and use the JavaScript API to show the annotation toolbar and load annotations.
Prerequisites
- Visual Studio 2026 with the .NET 10 SDK. The steps were written with Visual Studio 2026 and .NET 10. The engine package requires .NET 8 or higher.
- A TX Text Control .NET Server license. To install packages from the Text Control private NuGet feed, a serial number must be assigned to your email address, and Visual Studio must be configured to use the feed.
For supported operating systems and browsers, see System Requirements.
Create the Project
- In Visual Studio 2026, choose Create a new project.
- Select ASP.NET Core Web App (Model-View-Controller) as the project template and confirm with Next.
- Enter a project name, choose a location and confirm with Next.
- Choose .NET 10.0 (Long Term Support) as the Framework and confirm with Create.
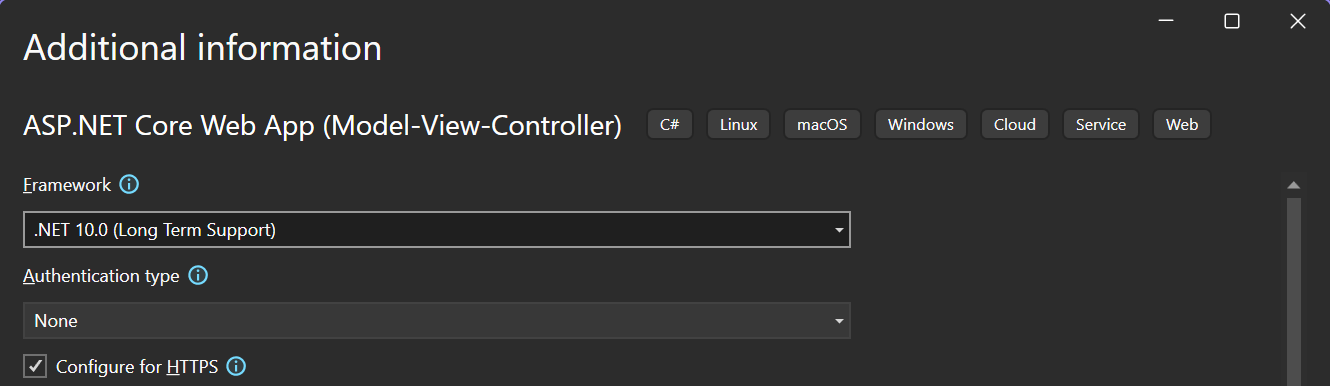
Without Visual Studio, for example in the terminal of Visual Studio Code or on Linux, create the same project with the .NET CLI and change to its folder:
dotnet new mvc MyViewerApp net10.0
cd MyViewerApp
Install the NuGet Packages
The viewer needs two packages:
| Package | Description |
|---|---|
TXTextControl.Web.DocumentViewer | The Document Viewer for ASP.NET Core web applications, using the Core version of TX Text Control |
TXTextControl.TextControl.Core.SDK | TX Text Control Core, the cross-platform engine that loads and renders the documents on the server |
- In Solution Explorer, select your project and choose Manage NuGet Packages... from the Project menu.
- Select the Text Control private NuGet feed as the Package source.
- Install
TXTextControl.Web.DocumentViewerandTXTextControl.TextControl.Core.SDK.
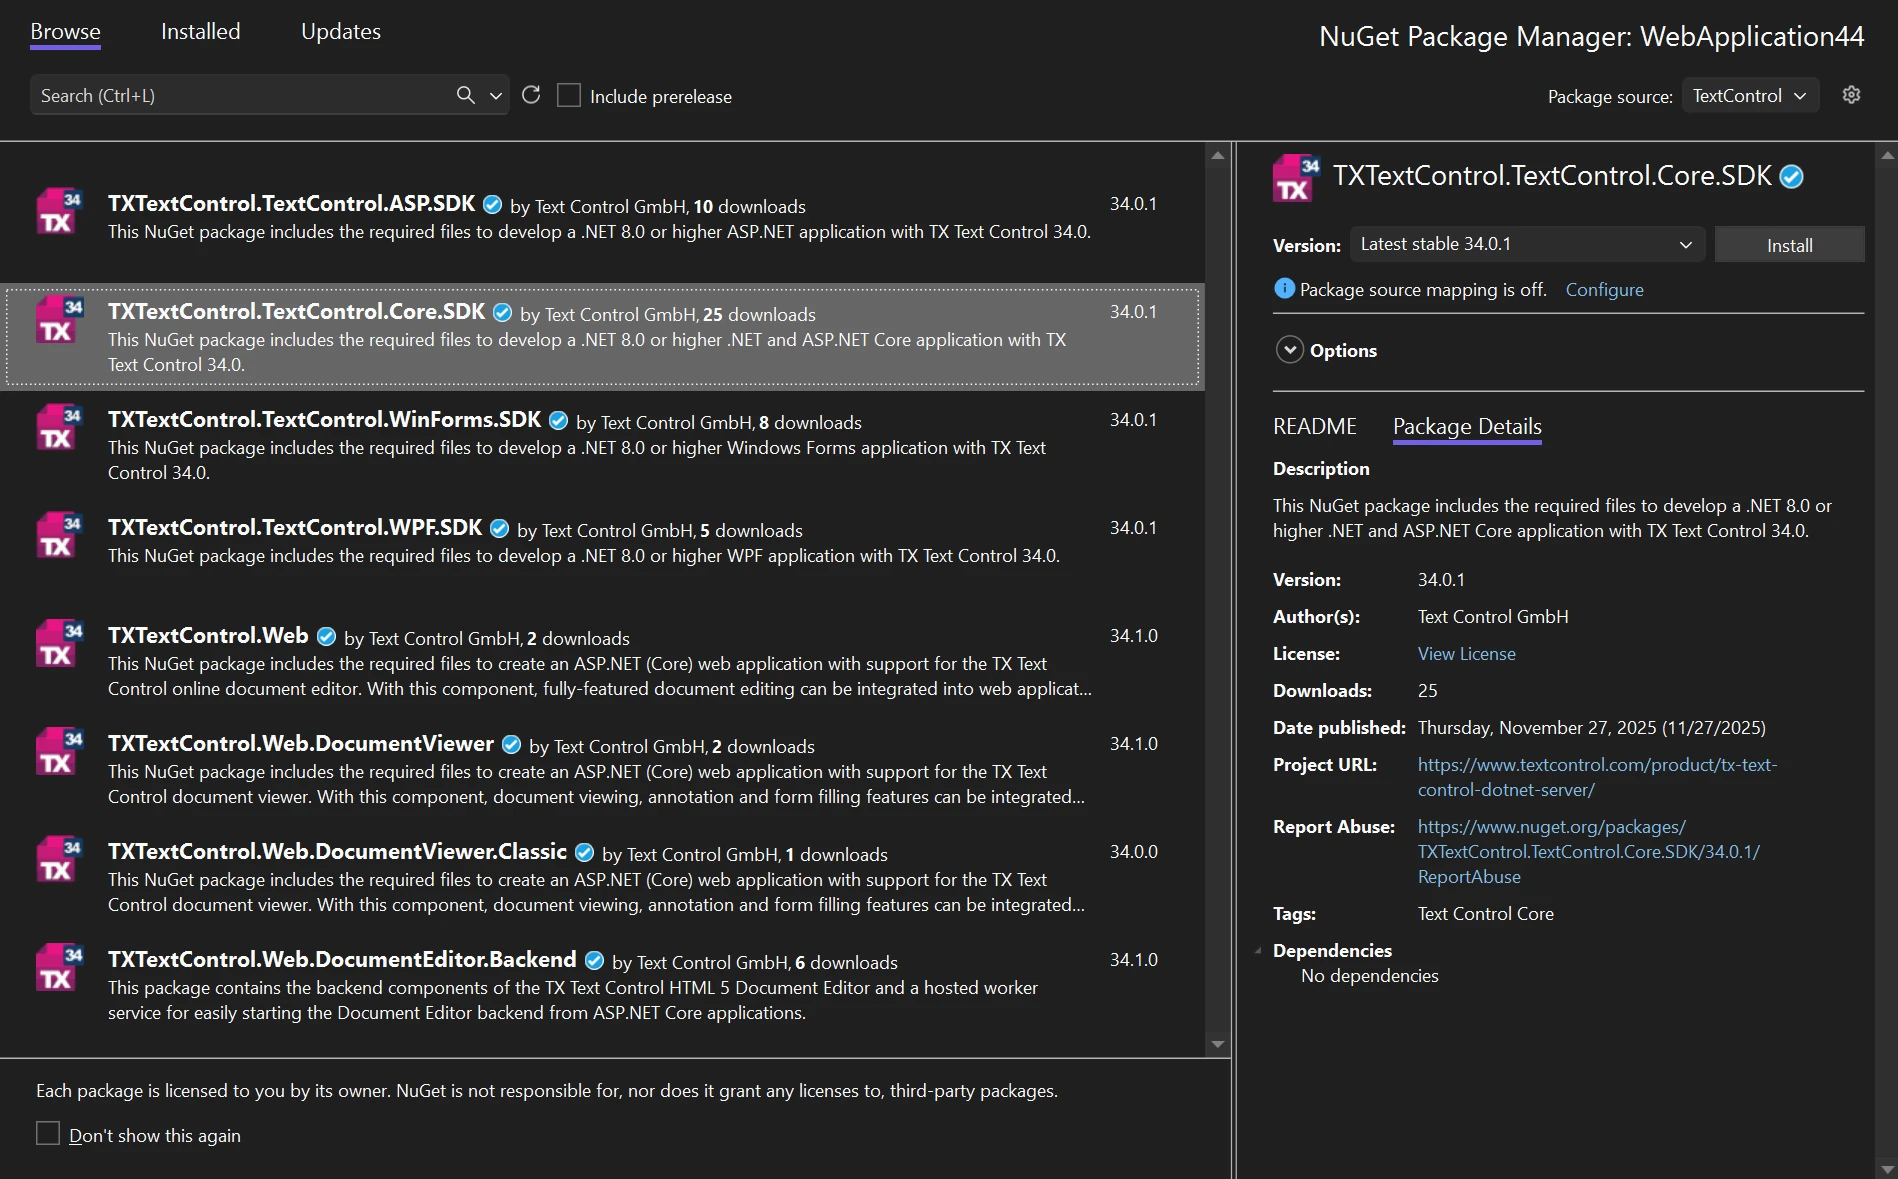
Alternatively, open a terminal in the project folder and install the packages with the .NET CLI:
dotnet add package TXTextControl.Web.DocumentViewer
dotnet add package TXTextControl.TextControl.Core.SDK
The engine package TXTextControl.TextControl.Core.SDK from the private NuGet feed contains your license. There are no activation dialogs and no license files to manage.
If your application must use the Windows-only Classic engine, install TXTextControl.Web.DocumentViewer.Classic and TXTextControl.TextControl.ASP.SDK instead. Note that the Core engine cannot load DOC files.
Keep Program.cs Unchanged
You don't need to change Program.cs. The ASP.NET Core MVC template already registers controllers and their routes, and the official MVC samples for the Document Viewer use the template's Program.cs as it is.
Applications without MVC views, such as the Web API backend for the Angular and React frontends, add the viewer to the request pipeline with app.UseTXDocumentViewer() instead.
Add the Document Viewer to the View
- In Solution Explorer, open Views/Home/Index.cshtml.
- Replace the complete content with the following code and save the file:
@using TXTextControl.Web.MVC.DocumentViewer
@using System.Text

<div style="width: 800px; height: 600px;">

@Html.TXTextControl().DocumentViewer(settings => {
    settings.DocumentData = Convert.ToBase64String(
        Encoding.ASCII.GetBytes("<strong>Sample Content</strong>"));
    settings.Dock = DocumentViewerSettings.DockStyle.Fill;
}).Render()

</div>

<script>

    var jsonAnnotations = '[[{"pen":{"type":"comment","objectWidth":32,"objectHeight":32},"user":"Unknown User","location":{"x":127,"y":50},"time":1658908087097,"comments":[{"comment":"Welcome to Text Control","user":"Unknown User","date":1658908100339,"id":"c8d818ce-ff1e-4c0c-b78c-6ba95a98dede","status":"none"}],"id":"feed80ff-1c94-4abf-9838-3e833faa4092","status":"Accepted"}]]';

    window.addEventListener("documentViewerLoaded", function () {
        TXDocumentViewer.annotations.showToolbar(true);
        TXDocumentViewer.annotations.load(jsonAnnotations);
    });

</script>
The code does the following:
@using TXTextControl.Web.MVC.DocumentViewerimports the namespace that contains the viewer's HTML helper and the DocumentViewerSettings class.Html.TXTextControl().DocumentViewer(...)creates the viewer. The lambda expression receives aDocumentViewerSettingsobject in which you configure the viewer.Render()writes the viewer to the page.- DocumentData contains the document as a Base64-encoded string. In this example, the document is a short HTML string. The viewer recognizes the document format automatically.
- Dock is set to
Fill, so the viewer fills the surroundingdivelement of 800 by 600 pixels. - The script waits for the
documentViewerLoadedevent, shows the annotation toolbar and loads a comment annotation from a JSON string. See Use the JavaScript API below.
Run the Application
Press F5 to build and start the application, or run dotnet run in the project folder and open the URL it prints in the browser. On the home page, the Document Viewer shows the text "Sample Content", the annotation toolbar and a comment annotation with the text "Welcome to Text Control".
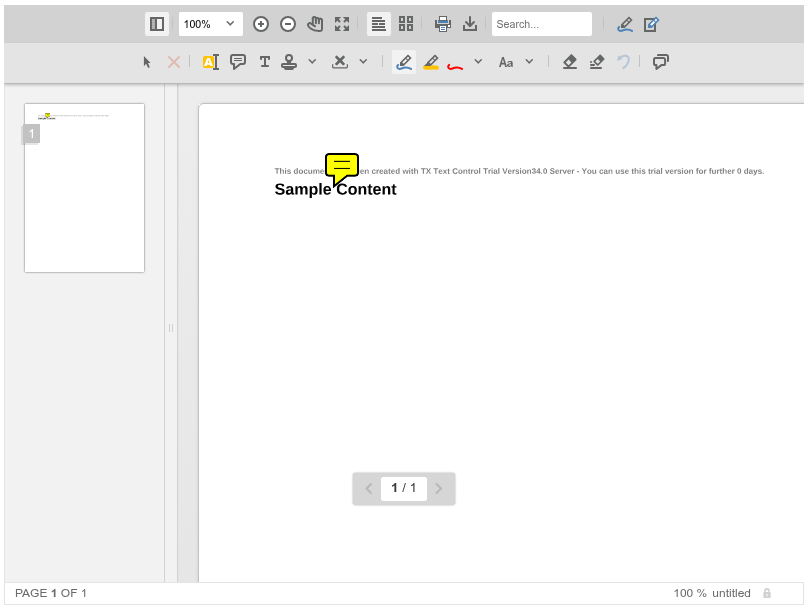
The comment annotation appears as an icon on the page. The small gray line above "Sample Content" is the trial text that documents rendered with the trial packages contain, as Trial and Licensed Packages explains.
Run the Application on Linux
Because the application uses the cross-platform Core engine, it also runs on Linux without code changes. To test this on Windows, select WSL as the startup profile in Visual Studio and start the application, as Development Environments describes together with the installation of WSL.
Configure the Viewer
Dock the Viewer
The Dock property accepts a value of the DockStyle enumeration:
| Value | Description |
|---|---|
Fill | The viewer is docked to all edges of its container and sized accordingly. |
Window | The viewer fills the browser window. |
With Fill, you control the size of the viewer through the size of the container element, as the div element in Index.cshtml shows.
Other Settings
The following DocumentViewerSettings properties are useful when you start:
| Property | Description |
|---|---|
| DocumentPath | The path and file name of the document to load. If DocumentData is also set, DocumentPath only defines the displayed document name. |
| ShowThumbnailPane | Specifies whether the page thumbnail pane is visible. It is visible by default. |
| ToolbarDocked | Specifies whether the toolbar is docked at the top of the viewer or floats in the upper right corner. |
| IsSelectionActivated | Specifies whether users can select text on the active page and copy it to the clipboard. |
| RenderMode | Specifies how pages are rendered: Auto (default), Bitmap, GlyphOutlines (SVG vector graphics) or Font. |
| SignatureSettings | Settings for a signing process, such as the signature boxes and the URL that receives the signed document. |
For example, the following settings hide the thumbnail pane and render all pages as SVG vector graphics. ComponentRenderMode is in the TXTextControl.Web.MVC.DocumentViewer namespace that Index.cshtml already imports.
@Html.TXTextControl().DocumentViewer(settings => {
    settings.DocumentData = Convert.ToBase64String(
        Encoding.ASCII.GetBytes("<strong>Sample Content</strong>"));
    settings.Dock = DocumentViewerSettings.DockStyle.Fill;
    settings.ShowThumbnailPane = false;
    settings.RenderMode = ComponentRenderMode.GlyphOutlines;
}).Render()
Load a Document
The viewer loads a document either from a file path or from a Base64-encoded string. With the Core engine, supported formats are DOCX, PDF, RTF, HTML and TX.
PDF documents are imported by the document engine by default, like the other formats, so they are rebuilt rather than shown as they are. To display PDF pages unchanged, the viewer can render them with PDF.js, the PDF renderer of Mozilla. Loading Documents shows the settings.
Load a File With DocumentPath
- In Solution Explorer, create a folder named App_Data in the project root.
- Copy a document into the folder, for example template.docx.
- In Index.cshtml, replace the
DocumentDatasetting withDocumentPath:
@Html.TXTextControl().DocumentViewer(settings => {
    settings.DocumentPath = "App_Data/template.docx";
    settings.Dock = DocumentViewerSettings.DockStyle.Fill;
}).Render()
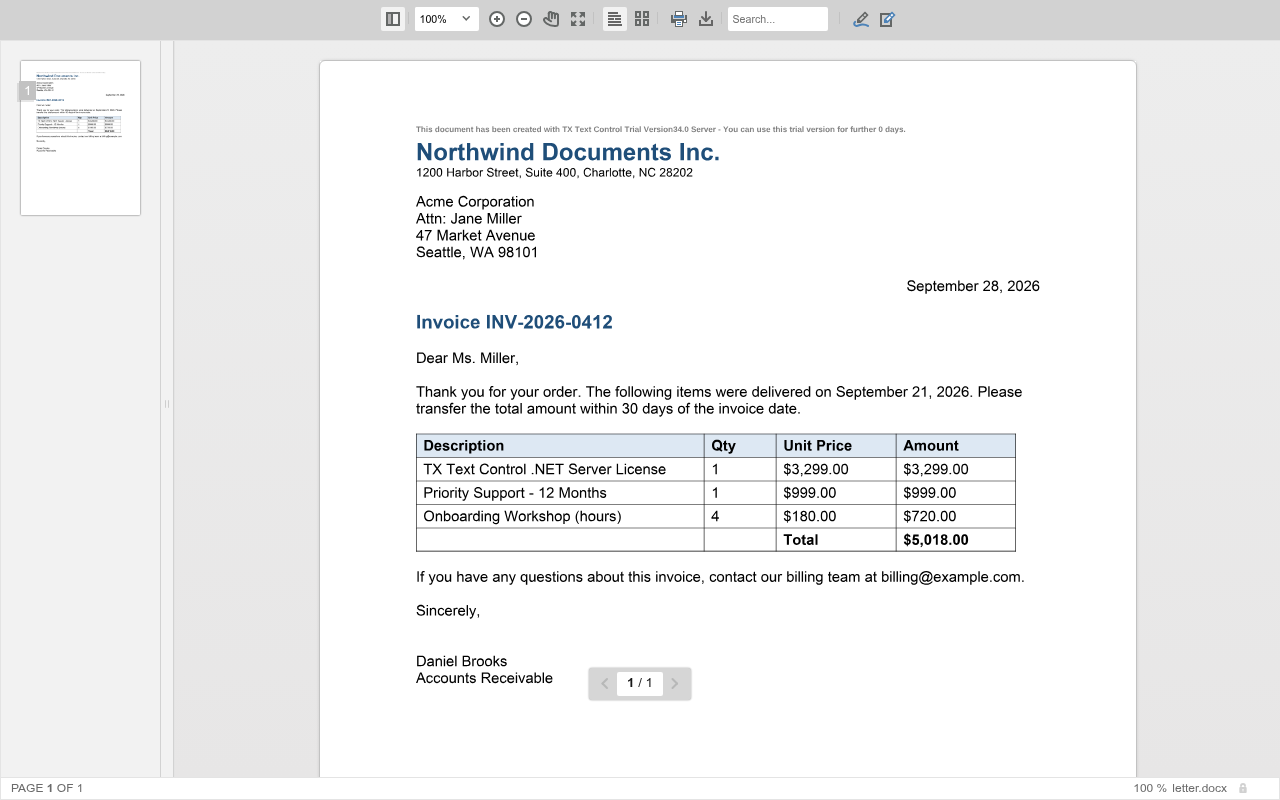
The viewer shows the pages of the document with their layout, the page thumbnails on the left and the file name in the status bar:
Load a Document From Memory With DocumentData
When your document comes from a database, a storage service or an upload, pass its bytes as a Base64-encoded string to DocumentData. Because DocumentData has priority, you can use DocumentPath at the same time to define the document name that the viewer displays. In Index.cshtml, replace the div element that contains the viewer with the following code:
@{
    byte[] document = System.IO.File.ReadAllBytes("App_Data/template.docx");
}

<div style="width: 800px; height: 600px;">

@Html.TXTextControl().DocumentViewer(settings => {
    settings.DocumentData = Convert.ToBase64String(document);
    settings.DocumentPath = "template.docx";
    settings.Dock = DocumentViewerSettings.DockStyle.Fill;
}).Render()

</div>
In a real application, the controller usually loads the document and passes it to the view, for example as part of the view model.
Use the JavaScript API
In the browser, the viewer is controlled with the TXDocumentViewer JavaScript object. The object is only available after the viewer has been initialized. The viewer then raises the documentViewerLoaded event, which you handle on the window object. Always access TXDocumentViewer in a handler of this event or later, as the script in Index.cshtml does:
- annotations.showToolbar shows or hides the annotation toolbar.
- annotations.load loads annotations from a JSON string.
Load a Document From JavaScript
loadDocument loads a Base64-encoded document into the viewer. The second parameter is the document name displayed in the viewer. To try it, replace the documentViewerLoaded event handler in Index.cshtml with the following code:
window.addEventListener("documentViewerLoaded", function () {
    TXDocumentViewer.loadDocument(btoa("<strong>Loaded with JavaScript</strong>"), "loaded.html");
});
Save Annotations
Users add annotations with the annotation toolbar. To store them, for example in your database, export them as a JSON string with annotations.export and show them again with annotations.load, as Work With Annotations in the JavaScript tutorial shows.
The addEventListener method of TXDocumentViewer supports events such as annotationsChanged, signaturesCompleted, documentLoaded, documentLinkClicked, hypertextLinkClicked and zoomChanged.
Next Steps
- JavaScript: more about the JavaScript API, including signatures.
- Loading Documents: pass documents from a controller, load them at run time and show PDF files with PDF.js.
- Annotations: let users comment on and mark up documents.
- Digital Signatures: collect signatures and sign documents on the server.