
Open the Spell Check Dialog
Underlines point out mistakes one at a time; a spelling dialog goes through all of them in order. With TX Spell .NET connected, the user can open a dialog from the context menu or from a button of yours, and correct the whole document word by word. You add a Check Spelling button to the application of Create Your First WPF Application and try both dialogs that are available.
Prerequisites
- The application of Create Your First WPF Application or Create a .NET Framework Application: a
TextControlcalled textControl1, connected to aTXSpellCheckerresource with the key txSpellChecker1.
Open the Dialog Without Code
The application already offers the dialog: right-click an underlined word and click Spell Check Dialog..., as Correct Words from the Context Menu shows.
With the ribbon of TX Text Control, the Proofing tab, a RibbonProofingTab, holds the spelling and hyphenation buttons as well. These buttons work only when the TextControl has a spell checker connected.
Add a Check Spelling Button
For a check started by the user, or before the document is saved, open the dialog in code:
In MainWindow.xaml, add a
Buttonabove theTextControlinside theDockPanel. Controls are docked in the order they appear, so place it before theTextControl:<Button x:Name="buttonSpelling" DockPanel.Dock="Top" Content="Check Spelling" Click="buttonSpelling_Click" />In MainWindow.xaml.cs, add the handler and call the SpellCheckDialog method of the
TextControl:private void buttonSpelling_Click(object sender, RoutedEventArgs e) { // Open the spelling dialog of TX Text Control textControl1.SpellCheckDialog(); }Press F5, type a few misspelled words and click Check Spelling.
The dialog steps through all misspelled words of the document: the main text first, then the headers, footers and text frames. SpellCheckDialog works only when a spell checker is connected through the SpellChecker property.
Use the Customizable Dialog of TX Spell .NET
The dialog that SpellCheckDialog opens belongs to TX Text Control and can't be changed. TX Spell .NET has a dialog of its own, which works the same way but can be customized: buttons can be added, removed or relabeled, and your code is notified of every change. Open it with the SpellCheckDialog property of the spell checker.
The spell checker is a resource of the window, so the code-behind gets it with FindResource first. The class below replaces the button handler of the previous section:
using System.Windows;
using TXTextControl.WPF.Proofing;

public partial class MainWindow : Window
{
    private readonly TXSpellChecker txSpellChecker1;

    public MainWindow()
    {
        InitializeComponent();

        // The spell checker declared in Window.Resources
        txSpellChecker1 = (TXSpellChecker)FindResource("txSpellChecker1");
    }

    private void buttonSpelling_Click(object sender, RoutedEventArgs e)
    {
        // Open the customizable dialog of TX Spell .NET for this TextControl
        txSpellChecker1.SpellCheckDialog.Show(textControl1);
    }
}
Keep the namespace that Visual Studio created around the class. Show takes the TextControl to check. The dialog applies the corrections to the document itself, so no further code is needed:
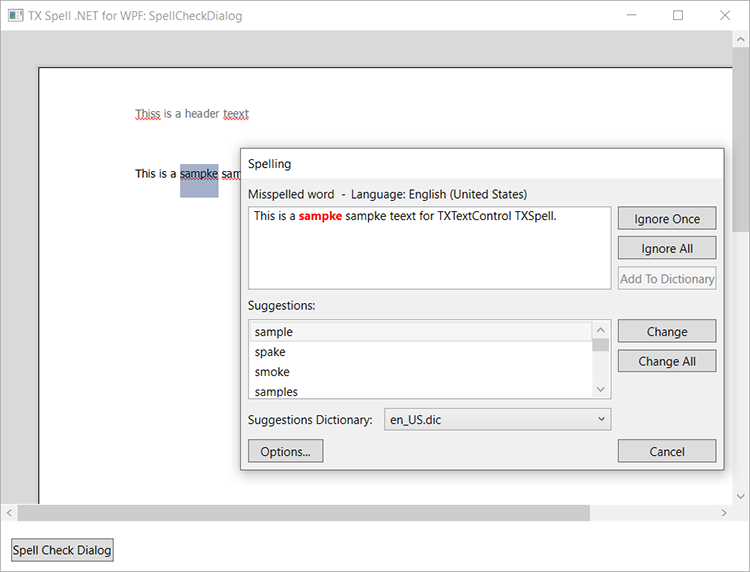
It shows the language of the word above the sentence and, below the suggestions, a Suggestions Dictionary list, which chooses the dictionary the suggestions come from when several are loaded. Options... opens the options dialog.
Correct the Words in the Dialog
The dialog of TX Spell .NET shows the misspelled word in its sentence and the suggestions below. For each word, the user chooses what to do:
- Select a suggestion and click Change to replace this occurrence, or Change All to replace every occurrence of the word.
- Click Ignore Once to skip this occurrence, or Ignore All to skip every occurrence.
- Click Add To Dictionary to accept the word for good. This needs an editable user dictionary; see User Dictionaries.
- Click Cancel to stop before the end.
The dialog then moves on to the next misspelled word.
The TextControl\SpellCheckDialog sample of the setup is built this way; Spell Checking Examples lists where it is installed.
Next Steps
- Checking on Demand: compare the two dialogs and control how a check ends.
- Spell Check Dialog: every part of the dialog of TX Spell .NET.
- Customizing the Spell Check Dialog: add, remove and relabel its buttons.
- Checking Multiple Controls: check several editors in one dialog.