
Create a .NET Framework Application
Many WPF applications in production still target the .NET Framework 4.8, and TX Text Control .NET for WPF runs in them as well. You build the small word processor of the Simple sample that the setup installs: a TextControl with a button bar, rulers and a status bar, and a menu that opens and saves files, uses the clipboard and shows the formatting dialog boxes. The XAML and the code are the same as in a .NET project; the references and the license reach the project in a different way.
Prerequisites
- Visual Studio on Windows with the .NET Framework 4.8. See .NET and .NET Framework.
- The setup of TX Text Control .NET for WPF 34.0, the full or the trial version. For .NET Framework projects, it provides the assemblies, the license and the toolbox tab. See Installing the Product.
Create the Project
Open Visual Studio and create a new project.
Select C# from the Languages list, Windows from the Platform list and Desktop as the Project Type.
Select the project template WPF App (.NET Framework) and click Next.
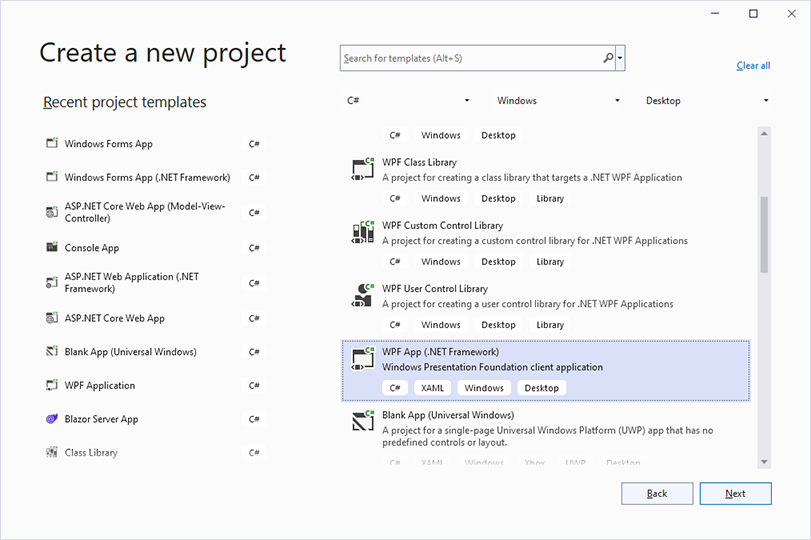
Enter a project name, select .NET Framework 4.8 in the Framework list and click Create.
No NuGet package is installed: in a .NET Framework project, the assemblies come from the installation of the setup.
Build the Window
The window is built exactly as in the .NET tutorial. In short:
- In MainWindow.xaml, replace the
Gridwith aDockPanel. - In the toolbox tab TX Text Control 34.0, double-click ButtonBar. Visual Studio adds a reference to TXTextControl.WPF and asks you to restart the XAML Designer: click OK, then choose Build > Build Solution.
- With the window selected, double-click RulerBar, StatusBar, a second RulerBar and TextControl, in this order.
- Remove the
HeightandWidthattributes of the new elements and name thembuttonBar1,rulerBar1,statusBar1,rulerBar2andtextControl1. - Set DockPanel.Dock of
rulerBar2to Left, its HorizontalAlignment to Left and its VerticalAlignment to Stretch. - Select
textControl1and set its properties ButtonBar tobuttonBar1, RulerBar torulerBar1, StatusBar tostatusBar1and VerticalRulerBar torulerBar2.
Create Your First WPF Application shows each of these steps with screenshots and explains why the order matters.
Add a Menu
A WPF Menu at the top of the window gives the editor its commands. It has to be the first child of the DockPanel, so that it is docked above the button bar.
In the toolbox, find the WPF control Menu and double-click it.
In the XAML, move the
Menuelement to the top of theDockPanel, remove itsWidthandHeightattributes and setDockPanel.Dock="Top":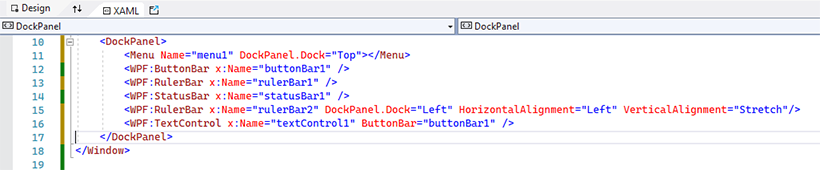
Replace the
Menuelement with the following XAML, which adds the menus File, Edit and Format:<Menu x:Name="menu1" DockPanel.Dock="Top"> <MenuItem Header="_File"> <MenuItem Header="_Open..." Click="MenuItemOpen_Click" /> <MenuItem Header="Save _As..." Click="MenuItemSaveAs_Click" /> <Separator /> <MenuItem Header="E_xit" Click="MenuItemExit_Click" /> </MenuItem> <MenuItem Header="_Edit"> <MenuItem Header="Cu_t" Click="MenuItemCut_Click" /> <MenuItem Header="_Copy" Click="MenuItemCopy_Click" /> <MenuItem Header="_Paste" Click="MenuItemPaste_Click" /> </MenuItem> <MenuItem Header="F_ormat"> <MenuItem Header="_Character..." Click="MenuItemCharacter_Click" /> <MenuItem Header="_Paragraph..." Click="MenuItemParagraph_Click" /> </MenuItem> </Menu>Add
Loaded="textControl1_Loaded"to theWPF:TextControlelement.
Run the Application
Press F5. The window shows the menu, the button bar, the rulers, the editor and the status bar. Type some text, format it with Format > Character..., and save it with File > Save As....
The same XAML and code build in a .NET project with the package TXTextControl.TextControl.WPF.SDK.
What Is Different in a .NET Framework Project
- The assemblies come from the setup. The project references TXTextControl.WPF.dll and TXTextControl.dll in the Assembly folder of the TX Text Control installation. Visual Studio adds the reference to TXTextControl.WPF when you add the first control. If your code uses types of the namespace
TXTextControland the reference to TXTextControl.dll is missing, add it with Project > Add Reference.... - The license comes through licenses.licx. The license compiler reads the entries of licenses.licx and embeds the license into your executable when you build. The file needs an entry for
TXTextControl.WPF.TextControlwith the full version of the assembly you reference, and its build action is Embedded Resource; the Simple sample keeps it in the Properties folder. If the application reports that a control could not be licensed, see Licensing and Development Licenses. - Deployment is yours. You ship the assemblies and native libraries with the application. See Deploying .NET Framework Applications.
The Finished Sample
The setup installs this tutorial as a finished project in %USERPROFILE%\Documents\TX Text Control 34.0.NET for WPF\CSharp\Tutorial\Simple, and in Visual Basic under VB.NET\Tutorial\Simple.
Next Steps
- Load and Save Documents: New, Open, Save and Save As with a prompt for unsaved changes.
- Migrating from .NET Framework to .NET: move the project to .NET 8 or higher later.
- Create a WPF Ribbon Application: ribbon tabs instead of the button bar.