
Create Your First WPF Application
A WPF window becomes a word processor when you place a TextControl in its XAML, together with a button bar for formatting, two rulers and a status bar. The steps below start from an empty Visual Studio project for .NET 8 or higher, add the TX Text Control NuGet package and build that window with the toolbox and the Properties window. One short handler at the end loads a document as soon as the editor is ready.
Prerequisites
- Visual Studio on Windows. Version 34.0 has been tested with Visual Studio 2026. See Visual Studio.
- The setup of TX Text Control .NET for WPF 34.0, the full or the trial version, installed on your development machine. It provides the package source Text Control Offline Packages and the toolbox items for the XAML Designer. See Installing the Product.
Create the Project
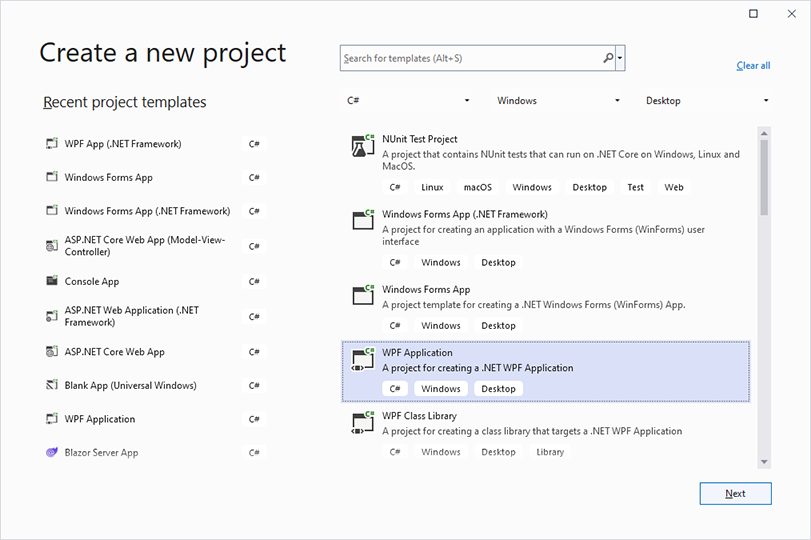
Open Visual Studio and create a new project.
Select C# from the Languages list, Windows from the Platform list and Desktop as the Project Type.
Select the project template WPF Application and click Next.
Enter a project name, for example MyWPFApp, and click Next.
Select .NET 8 or higher as the Framework, for example .NET 10, and click Create.
The template WPF App (.NET Framework) creates a .NET Framework project instead. Create a .NET Framework Application covers it.
Install the NuGet Package
Select the project in Solution Explorer and choose Project > Manage NuGet Packages....
Select Text Control Offline Packages in the Package source list and click Browse.
Select
TXTextControl.TextControl.WPF.SDKand click Install.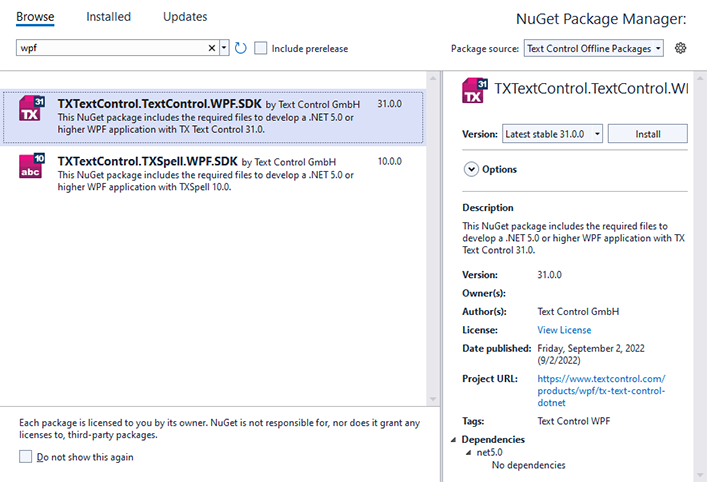
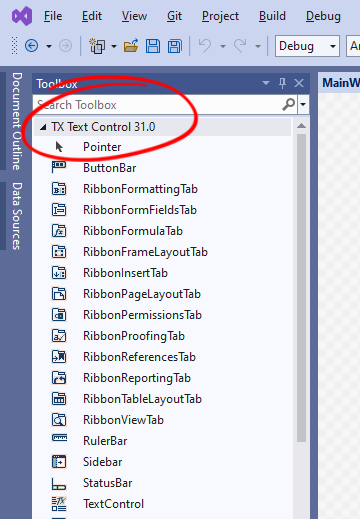
The package brings the WPF controls, the document engine and the license file of your installation into the project. When it is installed, the toolbox shows the tab TX Text Control 34.0 while a XAML file is open:
Package Overview lists what the package contains.
Prepare the Window
Visual Studio creates MainWindow.xaml with a Grid as the root element of the window's content. The controls of this tutorial are arranged by a DockPanel, which places each child at one side of the window and gives the last child the space that is left.
Open MainWindow.xaml from Solution Explorer.
In the XAML view, replace the
<Grid>and</Grid>tags with<DockPanel>and</DockPanel>: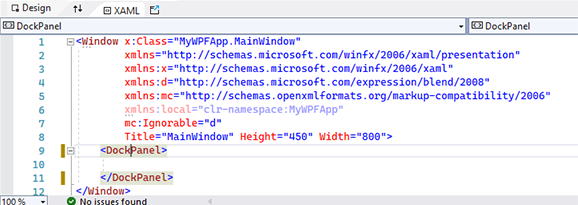
Add the Editor and Its Bars
The order in which you add the controls decides where they appear, because the DockPanel arranges its children in the order of the XAML. The TextControl comes last, so that it fills the space the bars leave.
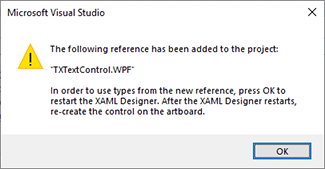
In the toolbox tab TX Text Control 34.0, double-click ButtonBar to add it to the window. For the first control of TX Text Control, Visual Studio adds a reference to TXTextControl.WPF and asks you to restart the XAML Designer. Click OK.
Choose Build > Build Solution.
Select the window, not the button bar you added, in the designer or in the XAML. Then double-click RulerBar, StatusBar, a second RulerBar and TextControl in this order. Select the window again before each double-click.
In the XAML, remove the
HeightandWidthattributes that Visual Studio added to the new elements.Name the elements
buttonBar1,rulerBar1,statusBar1,rulerBar2andtextControl1, in this order: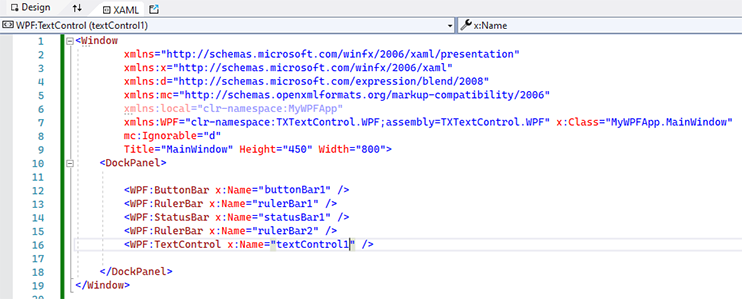
Visual Studio also added the namespace declaration xmlns:WPF="clr-namespace:TXTextControl.WPF;assembly=TXTextControl.WPF" to the Window element. The prefix WPF in front of each element name refers to it. Add TextControl in XAML explains the declaration and shows how to write the XAML without the toolbox.
Place the Vertical Ruler
The second ruler shows the vertical positions of the page and belongs at the left side of the editor.
In the XAML view of MainWindow.xaml, add the docking and alignment attributes to the existing rulerBar2 element:
<WPF:RulerBar x:Name="rulerBar2" DockPanel.Dock="Left"
              HorizontalAlignment="Left" VerticalAlignment="Stretch" />
DockPanel.Dock is an attached property of WPF. Set it in XAML even when the Properties window does not list it. Keep this element before textControl1 in the DockPanel.
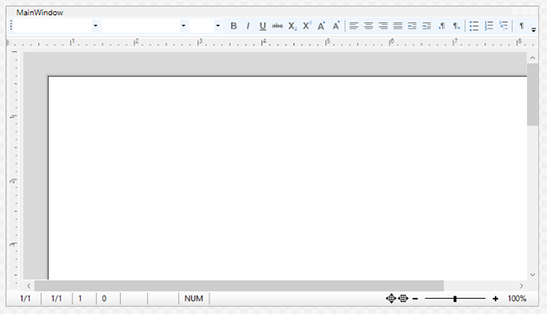
A RulerBar docked at the left or right of the window shows a vertical scale. The Design view now shows the button bar and the horizontal ruler at the top, the vertical ruler at the left and the status bar at the bottom:
Connect the Bars to the Editor
The bars show and change the formatting of the text only when the TextControl knows them. It connects to each bar through a property that holds the bar's name.
Select
textControl1in the Design view.In the Properties window, find the ButtonBar property and type
buttonBar1.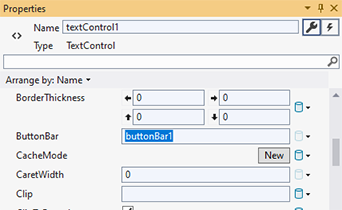
Set RulerBar to
rulerBar1, StatusBar tostatusBar1and VerticalRulerBar torulerBar2.
The XAML of the window now reads as follows. The namespace of x:Class is the name of your project:
<Window x:Class="MyWPFApp.MainWindow"
        xmlns="http://schemas.microsoft.com/winfx/2006/xaml/presentation"
        xmlns:x="http://schemas.microsoft.com/winfx/2006/xaml"
        xmlns:d="http://schemas.microsoft.com/expression/blend/2008"
        xmlns:mc="http://schemas.openxmlformats.org/markup-compatibility/2006"
        xmlns:local="clr-namespace:MyWPFApp"
        xmlns:WPF="clr-namespace:TXTextControl.WPF;assembly=TXTextControl.WPF"
        mc:Ignorable="d"
        Title="MainWindow" Height="450" Width="800">
    <DockPanel>
        <WPF:ButtonBar x:Name="buttonBar1" />
        <WPF:RulerBar x:Name="rulerBar1" />
        <WPF:StatusBar x:Name="statusBar1" />
        <WPF:RulerBar x:Name="rulerBar2" DockPanel.Dock="Left" HorizontalAlignment="Left" VerticalAlignment="Stretch" />
        <WPF:TextControl x:Name="textControl1" Loaded="textControl1_Loaded"
                         ButtonBar="buttonBar1" RulerBar="rulerBar1"
                         StatusBar="statusBar1" VerticalRulerBar="rulerBar2" />
    </DockPanel>
</Window>
The attribute Loaded="textControl1_Loaded" is not there yet: the next section adds it.
Load a Document When the Editor Is Ready
Code that works with the document runs in the Loaded event of the TextControl. WPF raises this event once the control has been loaded into the window; in the constructor of the window, the editor isn't ready for a document yet.
In the XAML, add
Loaded="textControl1_Loaded"to theWPF:TextControlelement, as in the XAML above.Right-click
textControl1_Loadedand choose Go To Definition. Visual Studio creates the handler in MainWindow.xaml.cs.Complete MainWindow.xaml.cs as follows:
using System.Windows;
using TXTextControl;

namespace MyWPFApp
{
    public partial class MainWindow : Window
    {
        public MainWindow()
        {
            InitializeComponent();
        }

        private void textControl1_Loaded(object sender, RoutedEventArgs e)
        {
            // Show pages like a printed document
            textControl1.ViewMode = ViewMode.PageView;

            // Replace the contents with a DOCX file
            textControl1.Load("document.docx", StreamType.WordprocessingML);

            // Put the input focus into the editor
            textControl1.Focus();
        }
    }
}
Copy a file named document.docx into the output folder of the project, such as bin\Debug\net10.0-windows, or pass its full path. DOCX files are supported by the Professional and Enterprise editions; with the Standard edition, load an RTF file with
StreamType.RichTextFormatinstead.
The code works as follows:
using TXTextControl;makes the enumerationsViewModeandStreamTypeavailable. The WPF controls themselves are in the namespaceTXTextControl.WPF.- ViewMode sets how the editor displays the document.
PageViewshows the pages with gaps between them on a background, and headers and footers as they are printed. - Load replaces the complete contents of the editor with the file. StreamType
.WordprocessingMLis the DOCX format. Focusis a method of WPF: it moves the keyboard focus into the editor, so that the user can type at once.
Run the Application
Press F5. The window shows a word processor:
- The button bar at the top with the style, the font and the font size, buttons for bold, italic, underline and other character attributes, alignment, indents and lists.
- A horizontal ruler with the margins, indents and tabs of the current paragraph, and a vertical ruler at the left.
- The document from document.docx in page view.
- A status bar with the section, the page, the line and the column of the input position and a zoom slider.
Select some text and click a button of the button bar, or drag an indent marker of the ruler: the text changes, and the bars show the attributes of the text at the input position. Resize the window, and the editor and its bars follow.
Troubleshooting
- The toolbox has no tab TX Text Control 34.0. The tab appears in a .NET project after the package is installed from Text Control Offline Packages and a XAML file is open. See Visual Studio Toolbox and XAML Designer.
- The bars don't react to the text. A name in ButtonBar, RulerBar, VerticalRulerBar or StatusBar doesn't match the name of the bar. See Toolbox and XAML Designer.
- The document isn't loaded. Code in the constructor of the window runs before the editor is ready. Keep it in the
Loadedhandler, as Control Initialization describes. - Text Control Offline Packages isn't in the list. See Configuring Package Sources.
Next Steps
- Add TextControl in XAML: the namespace declaration, properties and events of the editor in XAML.
- Connect Rulers, Toolbars, and a Status Bar: choose the buttons of the button bar and what the status bar and the rulers show.
- Create a WPF Ribbon Application: the same editor with ribbon tabs instead of the button bar.
- Load and Save Documents: open and save documents from a menu, with and without dialog boxes.