
Visual Studio Toolbox and XAML Designer
In a WPF project, the toolbox of Visual Studio writes XAML for you: double-click a control of TX Text Control, and Visual Studio adds its element to the window, together with the namespace declaration and the assembly reference it needs. The XAML Designer then shows the editor, its bars and ribbon tabs as the user will see them, and the Properties window connects them by name. What the toolbox tab contains, how it appears in .NET and .NET Framework projects, and what happens when you place and connect the controls is described below.
The Toolbox Tab
The controls are in a toolbox tab named TX Text Control 34.0. Where it comes from depends on the kind of project:
- .NET 8 or higher. The package
TXTextControl.TextControl.WPF.SDKcontains a toolbox manifest that registers its controls for WPF projects. Install the package from Text Control Offline Packages, open the XAML of a window and the tab is in the toolbox. See Installing and Updating Packages. - .NET Framework. The setup provides the tab. In a project created with the template WPF App (.NET Framework), it is in the toolbox as soon as you open a window.
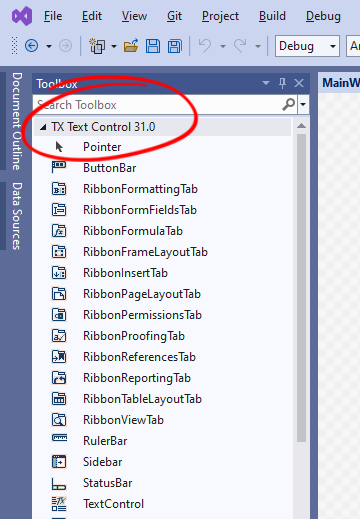
The screenshot shows the tab of version 31.0; version 34.0 has the same items in its tab TX Text Control 34.0:
Important
Designer Requires the Setup. The XAML Designer needs the setup on the development machine. The package from the Text Control Private NuGet Feed is meant for compiling on build servers and in CI/CD pipelines and contains no design-time components. See Installing the Product.
Text Control tested the toolbox, the designers and the project templates of version 34.0 with Visual Studio 2026 and .NET 10.
Items in the Tab
| Item | What it is |
|---|---|
| TextControl | The editor |
| ButtonBar | A toolbar that shows and sets the font and paragraph attributes |
| RulerBar | A ruler that shows and sets indents, margins and tabs, horizontally or vertically |
| StatusBar | A bar that shows the current input position and other status information |
| Sidebar | A container beside or below the editor for a predefined panel, such as the styles or the tracked changes, or your own content |
| RibbonFormattingTab, RibbonInsertTab, RibbonPageLayoutTab, RibbonViewTab, RibbonProofingTab, RibbonReportingTab and six more | The twelve predefined ribbon tabs, which also include the form fields, formula, frame layout, permissions, references and table layout tabs |
Two things are not in the tab:
- The ribbon itself. The ribbon tabs of TX Text Control derive from
System.Windows.Controls.Ribbon.RibbonTaband are hosted in theRibbonof WPF, from the assembly System.Windows.Controls.Ribbon. You write theRibbonelement in XAML, or add it to the toolbox with Tools > Choose Toolbox Items...: in the tab WPF Components, filter for Ribbon, select theRibbonof System.Windows.Controls.Ribbon and click OK. - The non-visual classes. ServerTextControl and MailMerge have no toolbox item in a WPF project. You create them in code; see Creating and Configuring Controls in Code.
Components describes what each control does.
Place the Editor in a Window
Double-clicking an item adds its element to the selected container of the window, typically a DockPanel that replaces the Grid of the template. For the first control of a project, Visual Studio also adds the reference to TXTextControl.WPF and the namespace declaration with the prefix WPF, and asks to restart the XAML Designer. The order in which you add the controls matters, because the DockPanel arranges its children in the order of the XAML and the TextControl has to come last. Create Your First WPF Application goes through these steps with screenshots.
Once placed, the bars, ribbon tabs and sidebars are connected to the editor by name: you type the name of a bar into the matching property of the TextControl in the Properties window, such as ButtonBar or RibbonFormattingTab. Connections Are Names lists every connecting property, and Create a WPF Ribbon Application and Add a Sidebar add ribbon tabs and a sidebar step by step.
Licensing and the Designer
The license reaches a .NET project through the license file of the package and a .NET Framework project through licenses.licx; the toolbox adds neither. Development Licenses covers both. If the tab is missing, the designer shows an error or the bars don't react to the editor, see Toolbox and XAML Designer in Troubleshooting.
Next Steps
- Create Your First WPF Application: place and connect the controls in a complete .NET project.
- Create a .NET Framework Application: the same with the .NET Framework.
- Assemblies and XAML Namespaces: the namespace declaration and the assemblies behind the controls.
- XAML Integration: declare and configure the controls in XAML without the toolbox.