
Create a Template
A mail merge starts with a template: a document with placeholders, called merge fields, where the data goes. In a Windows Forms application, users design templates in the editor with the Reporting ribbon tab, which lists the field names of your data. The steps below prepare the editor for designing templates, insert merge fields with the ribbon and in code, and save an invoice template that the next two tutorials fill with data.
Prerequisites
- The ribbon application from Create a Ribbon Application with Sidebar Support, with a
TextControlnamedtextControl1. - The Enterprise or Professional edition, which includes mail merge. See Editions and Feature Availability.
The Sample Data
The three mail merge tutorials use the same invoice. Add a file named invoice.json to the project and set its Copy to Output Directory property to Copy if newer:
[
  {
    "Company": "Contoso Ltd.",
    "Name": "Jane Miller",
    "InvoiceNumber": "INV-1001",
    "Items": [
      { "Description": "Consulting", "Quantity": 2, "Price": 150.00 },
      { "Description": "Training", "Quantity": 1, "Price": 480.00 }
    ]
  }
]
Each property becomes a field name: Company, Name and InvoiceNumber are merge fields of this tutorial, and the Items array fills a repeating block in Add Repeating Merge Blocks.
Add the Reporting Tab
- Select the ribbon by clicking its blue File tab title, and click its smart tag.
- Click Add a RibbonReportingTab.
The RibbonReportingTab has the groups Data Source, Merge Fields, Merge Blocks and View. Like every predefined tab, it works with the TextControl connected to its ribbon.

The Field Navigation button of the View group appears once a sidebar is connected to it, as described below.
Load the Sample Data Into the Tab
The tab offers the field names of a data source that is loaded into its DataSourceManager. The following code in Form1.cs loads invoice.json when the form opens:
using System;
using System.IO;
using System.Windows.Forms;
using TXTextControl;
using TXTextControl.DocumentServer.Fields;

public partial class Form1 : TXTextControl.Windows.Forms.Ribbon.RibbonForm
{
    public Form1()
    {
        InitializeComponent();
        Load += Form1_Load;
    }

    private void Form1_Load(object sender, EventArgs e)
    {
        // Fill the drop-downs of the Reporting tab with the names in the sample data
        ribbonReportingTab1.DataSourceManager.LoadJson(File.ReadAllText("invoice.json"));
    }
}
Use the name the designer gave the Reporting tab, shown in the Properties window. If your form is not a RibbonForm, derive it from Form instead.
LoadJson reads a JSON array of objects or a single object and derives the tables and columns from the property names. The sample data only feeds the drop-downs. The actual merge happens later, with any data of the same structure.
Users can load a data source themselves as well, with the Select Data Source drop-down of the tab, as Data Source describes.
Insert Merge Fields With the Ribbon
Press F5 and type the text of the invoice, for example Invoice and Dear, in the editor.
Place the input position where the company name goes.
Open the Insert Merge Field drop-down in the Merge Fields group of the Reporting tab and click Company. The drop-down lists the columns of the master table of the data source, here the fields of invoice.json:
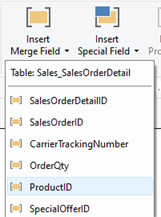
Insert Name and InvoiceNumber in the same way.
Each merge field appears as a placeholder in the text. Field Properties in the same group opens the options of the selected field, such as text before and after its value.
Insert Merge Fields in Code
Your code can insert merge fields as well, for example from a menu of your own. Add the following method to Form1 and call it with a field name:
// Insert a merge field at the current input position
private void InsertMergeField(string name)
{
    MergeField mergeField = new MergeField
    {
        Name = name,               // matched with the data
        Text = "«" + name + "»"    // shown in the template until it is merged
    };

    mergeField.ApplicationField.HighlightMode = HighlightMode.Activated;
    mergeField.ApplicationField.DoubledInputPosition = true;

    textControl1.ApplicationFields.Add(mergeField.ApplicationField);
}
The code works as follows:
- MergeField is an MS Word MERGEFIELD field. Its Name is matched with the field names of the data, and its Text is shown in the template until the field is merged.
- HighlightMode set to
Activatedhighlights the field when the input position is in it, and DoubledInputPosition lets users decide whether text they type at the edge of the field belongs to the field. - ApplicationFields.Add inserts the field at the input position.
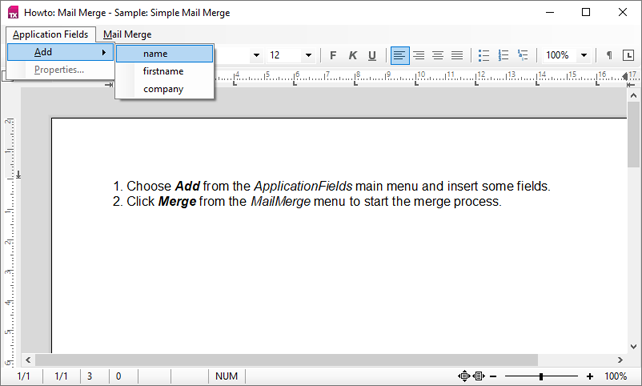
The Windows Forms mail merge sample uses the same method for its Application Fields menu:
Save the Template
Save the template as DOCX, for example from a Save Template button:
private void saveTemplateButton_Click(object sender, EventArgs e)
{
    // The merge fields are saved as MS Word MERGEFIELD fields
    textControl1.Save("invoice.docx", StreamType.WordprocessingML);
}
The merge fields are saved as MS Word MERGEFIELD fields. When you load the template again, import the fields with LoadSettings, as the next tutorial shows.
Next Steps
- Merge Data into Fields: fill the template with the invoice data.
- Merge Fields: field options, formats and special fields in detail.
- Reporting Ribbon and Dialog Boxes: the Reporting tab and its dialog boxes.
- The blog article Using the Reporting RibbonTab: the tab with a preview of the merged document.