
32-bit and 64-bit Applications
TX Text Control consists of .NET assemblies and native Windows libraries, and the native libraries exist twice: once for 32-bit and once for 64-bit processes. Whether your application runs as a 32-bit or a 64-bit process therefore decides which libraries it loads and ships. Read on to choose a build configuration and to set it up in Visual Studio.
Why Bitness Matters
The .NET assemblies of TX Text Control are the same for both, but the native libraries are compiled separately for 32-bit and 64-bit processors:
| 32-bit (x86) | 64-bit (x64) | |
|---|---|---|
| NuGet package | runtimes/win-x86/native | runtimes/win-x64/native |
| Setup (.NET Framework) | Assembly\bin | Assembly\bin64 |
Your application needs the set that matches the bitness of the process it runs in. The 64-bit version is part of all three editions.
A 64-bit application has more memory available, so it can open and save much larger documents than a 32-bit one.
Choose a Build Configuration
| Configuration | Runs as | Native libraries |
|---|---|---|
| x64 | A 64-bit process | The 64-bit set |
| x86 | A 32-bit process, on 32-bit and on 64-bit Windows | The 32-bit set |
| AnyCPU | A process with the bitness of the Windows it runs on | The set that matches the host: the 32-bit set on 32-bit Windows, the 64-bit set on 64-bit Windows |
- x64 is the configuration for a 64-bit application.
- x86 is the configuration for an application that has to run on both 32-bit and 64-bit Windows.
- AnyCPU, the default of new Visual Studio projects, works if you deploy the set of native libraries that matches the machine your application runs on.
The sample programs installed by the setup have an x86 and an x64 configuration.
Create x86 and x64 Configurations in Visual Studio
Open your project and choose Build > Configuration Manager.
In the Active solution platform list, select <New...>. The New Solution Platform dialog opens.
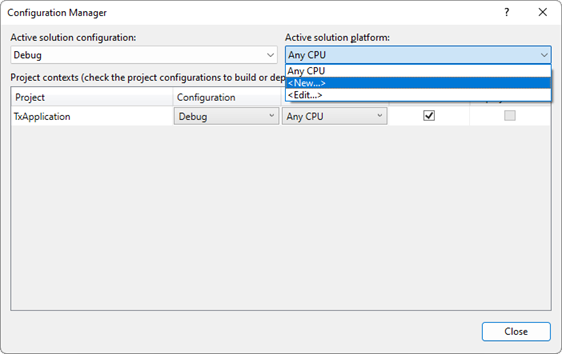
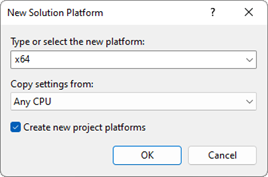
Select x64 and click OK.
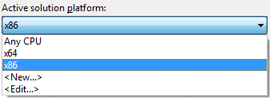
Repeat steps 2 and 3 for x86. The Active solution platform list now holds Any CPU, x64 and x86:
Optionally, remove Any CPU: select <Edit...> in the Active solution platform list, select Any CPU, click Remove and close the dialog.
Close the Configuration Manager.
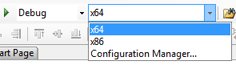
To compile for one of the platforms, select it in the Solution Platforms list of the Visual Studio toolbar.
Publishing .NET Applications
When you publish a .NET 8 or higher application with Build > Publish Selection, you select the target runtime in the publish settings, for example win-x64. The publish process copies the TX Text Control files for that runtime to the output folder. Publishing .NET Applications describes the steps.
The native libraries also need the Microsoft Visual C++ runtime of the same bitness. See Visual C++ Runtime Dependencies.