
Creating a Simple Word Processor
A small word processor built with TX Text Control ActiveX and Visual Basic 6 takes only a few lines of code. Starting from an empty project, you place a TXTextControl, a TXButtonBar, two TXRulerBar controls and a TXStatusBar on a form, connect them and add a menu. The finished program loads and saves files, uses the clipboard, opens dialog boxes for character and paragraph formatting and has a ruler bar, a status bar and a full keyboard and mouse interface.
The source code of this example is in the Samples\vb6\Simple sample source directory.
Create the Project
Before you start, run the TX Text Control installation program and start Visual Basic. Then create a project for the word processor:
- Select the New Project command from the File menu.
- Use the Project / Components... command to add the file tx4ole34.ocx to the new project.
Four additional icons appear at the bottom of the toolbox. They represent TXTextControl and its status bar, button bar and ruler bar:

The TXTextControl icon

The TXStatusBar icon

The TXButtonBar icon

The TXRulerBar icon
Place the Controls on the Form
Put the four controls on a form. Click the TXTextControl icon and draw the control on the form. In the same way, create a button bar, two ruler bars and a status bar.
Position the toolbars with the Align property:
- Button bar and first ruler bar. Set Align to 1 - Align Top.
- Status bar. Set Align to 2 - Align Bottom.
- Second ruler bar. Set its Direction property to 1 - Vertical and align it to the left by setting Align to 3 - Align Left.
These settings arrange everything except the width and the height of TXTextControl, which you set in Resize the Text Control. Your form now looks like this:
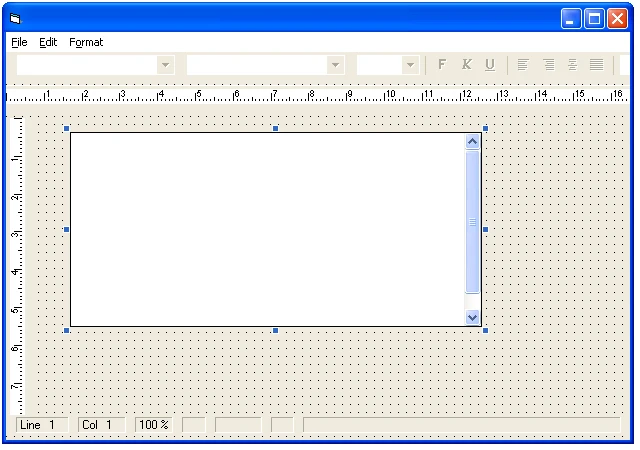
Connect the Controls
Add the following code to the form's Load event procedure:
Private Sub Form_Load()
   TXTextControl1.ButtonBarHandle = TXButtonBar1.hWnd
   TXTextControl1.RulerHandle = TXRuler1.hWnd
   TXTextControl1.VerticalRulerHandle = TXRuler2.hWnd
   TXTextControl1.StatusBarHandle = TXStatusBar1.hWnd
End Sub
The code works as follows:
- ButtonBarHandle specifies the button bar that
TXTextControl1uses, by the window handle that the hWnd property ofTXButtonBar1returns. - RulerHandle connects the horizontal ruler bar
TXRuler1, and VerticalRulerHandle the vertical ruler barTXRuler2. - StatusBarHandle connects the status bar
TXStatusBar1.
Run the Program
The word processor isn't finished yet, but you can run it and see what it does. Click the Start button. You can type text, select it with the mouse, copy it to the clipboard and paste it (with CTRL+C and CTRL+V, as long as there is no menu), select a different font, set tabs and do much more. All of these features are built into TXTextControl and need almost no programming.
Some features are still missing:
- When you resize the main window,
TXTextControlkeeps its old size. - There is no menu.
- There is no horizontal scroll bar.
The following steps add them.
Set the Page View
TX Text Control offers several view modes for different tasks. To work as a word processor, set the ViewMode property to Page View in the Properties window. This automatically adds the horizontal scroll bar, the page size and the margins.
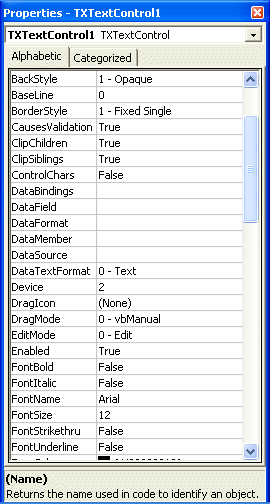
You can also choose the view mode on the Page tab of the control's property pages:
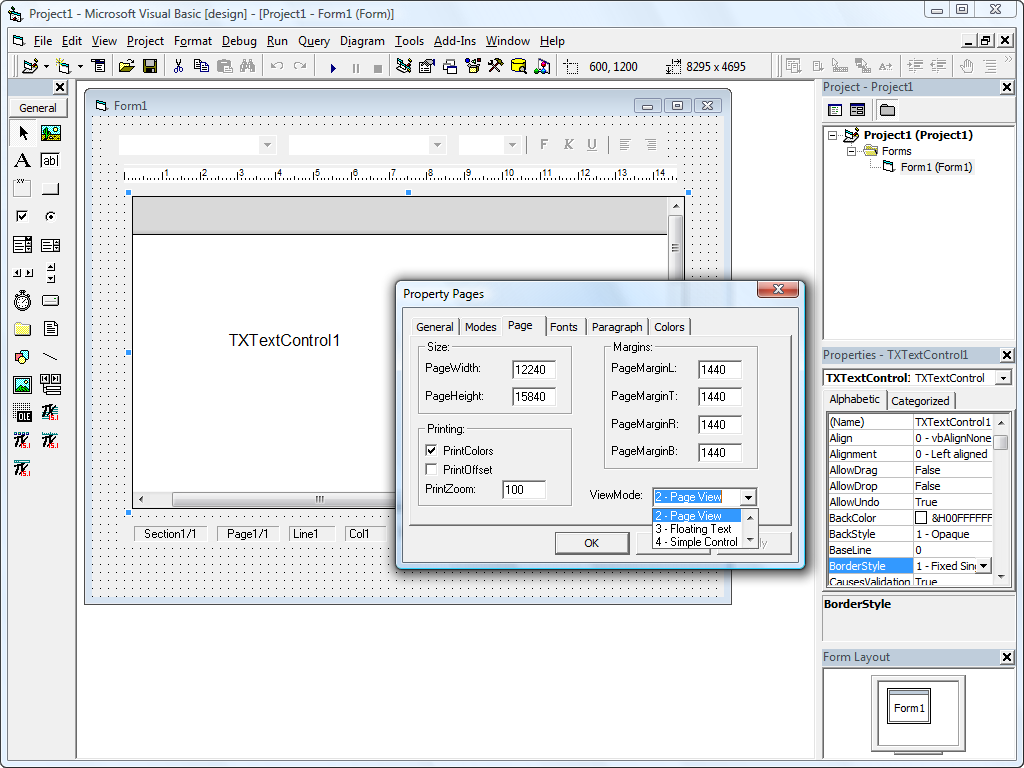
Resize the Text Control
To make TXTextControl resize with the main window, handle the form's Resize event:
- Open the code window of the form that contains
TXTextControl. - In the combo boxes at the top of the code window, select Form in the Object: box and Resize in the Proc: box.
The code window shows an empty procedure for the Resize event:
Private Sub Form_Resize ()
End Sub
Extend it as follows:
Private Sub Form_Resize ()
   If WindowState <> 1 Then
      TXTextControl1.Left = TXRuler2.Width
      TXTextControl1.Top = TXButtonBar1.Height + TXRuler1.Height
      TXTextControl1.Height = ScaleHeight - TXButtonBar1.Height _
         - TXRuler1.Height - TXStatusBar1.Height
      TXTextControl1.Width = ScaleWidth - TXRuler2.Width
   End If
End Sub
The code works as follows:
- Every time the size of the form changes, the position, width and height of
TXTextControl1are adjusted. While the form is minimized (WindowState1), the procedure changes nothing. LeftandTopplace the control to the right of the vertical ruler bar and below the button bar and the horizontal ruler bar.HeightandWidthfill the rest of the form'sScaleHeightandScaleWidth, leaving room for the bars.- The
_character continues one logical line of code on the next physical line.
Add a Menu
A menu gives the word processor access to the built-in dialog boxes of TXTextControl, the clipboard and files. You create the menus with the Visual Basic Menu Design Window; the Visual Basic documentation describes how to create menus.
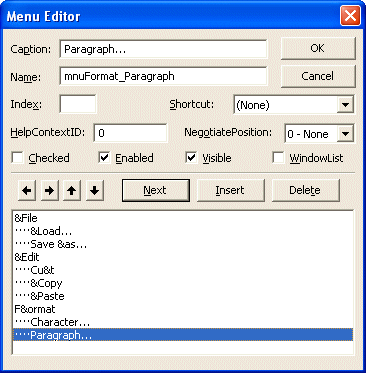
Format Menu
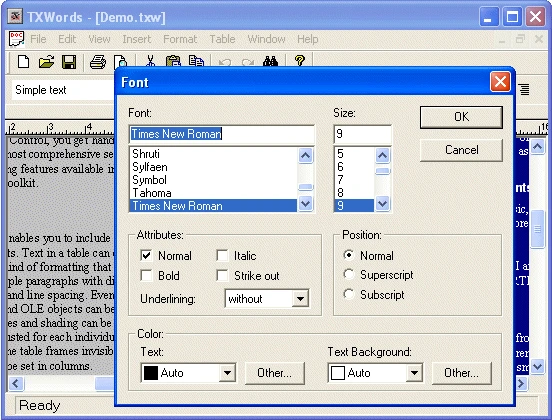
Create a Format menu with the items Character... and Paragraph.... Name the items mnuFormat_Character and mnuFormat_Paragraph, and add the following code to their Click procedures:
Private Sub mnuFormat_Character_Click()
   TXTextControl1.FontDialog
End Sub
Private Sub mnuFormat_Paragraph_Click()
   TXTextControl1.ParagraphDialog
End Sub
FontDialog opens the built-in font dialog box, and ParagraphDialog the built-in paragraph dialog box. Start the program again: the menu items now open the Font and Paragraph dialog boxes.
Edit Menu
In the Menu Design Window, create an Edit menu with the items Cut, Copy and Paste. The code for these menu items is:
Private Sub mnuEdit_Cut_Click()
   TXTextControl1.Clip 1
End Sub
Private Sub mnuEdit_Copy_Click()
   TXTextControl1.Clip 2
End Sub
Private Sub mnuEdit_Paste_Click()
   TXTextControl1.Clip 3
End Sub
The Clip method cuts the selection to the clipboard with 1, copies it with 2 and pastes the clipboard's contents with 3. With these menu items, you can exchange formatted text with other word processors through the clipboard.
File Menu
The last menu is a simple File menu:
- Create a File menu with the items Load... and Save As....
- Place a common dialog box icon on the form.
Then add the following code. It opens the common dialog box to get a file name from the user and then loads or saves the selected file:
Private Sub mnuFile_Load_Click()
   On Error Resume Next
   ' Create an "Open File" dialog box
   CommonDialog1.Filter = "TX Demo (*.tx)|*.tx"
   CommonDialog1.DialogTitle = "Open"
   CommonDialog1.Flags = cdlOFNFileMustExist Or _
      cdlOFNHideReadOnly
   CommonDialog1.CancelError = True
   CommonDialog1.ShowOpen
   If Err Then Exit Sub
   ' Pass the filename to the Text Control
   TXTextControl1.Load CommonDialog1.filename, 0
End Sub
Private Sub mnuFile_SaveAs_Click()
   On Error Resume Next
   ' Create a "Save File" dialog box
   CommonDialog1.Filter = "TX Demo (*.tx)|*.tx"
   CommonDialog1.DialogTitle = "Save As"
   CommonDialog1.Flags = cdlOFNOverwritePrompt Or _
      cdlOFNHideReadOnly
   CommonDialog1.CancelError = True
   CommonDialog1.ShowSave
   If Err Then Exit Sub
   ' Open the selected file
   TXTextControl1.Save CommonDialog1.filename, 0
End Sub
The code works as follows:
CommonDialog1shows an Open or a Save As dialog box for files with the extension .tx. BecauseCancelErrorisTrue, canceling the dialog box raises an error, andIf Err Then Exit Subleaves the procedure.- Load and Save read and write the selected file. The second parameter is the file offset, 0; without a format parameter, both methods use the internal Text Control format.
The Simple sample of version 34.0 goes one step further: its Load... and Save as... items offer RTF, DOC, DOCX, HTML and the TX format in the dialog box and pass the matching format value to Load and Save, for example 5 for RTF and 13 for DOCX. Working with Files describes the formats.
Next Steps
TX Text Control has many more features than this small program uses. Zoom, images, tables, OLE objects, paragraph frames and whatever else a full word processor needs are up to you. For hints on integrating special features, look at the source code of the other sample programs, or post a message in the Text Control support forum on www.textcontrol.com.
- Working with Files: the file formats and how to choose one when loading and saving.
- A Word Processor: the TXWords sample with page setup, printing, search and color dialog boxes.
- Text Formatting and Views: view modes and the coordinate system.
- How to Obtain Support: the ways to reach Text Control support.