
Bulleted and Numbered Lists
Do you need a list of items with bullets, with numbers or with outline numbers that include the numbers of the higher levels? In TXTextControl, a list is a paragraph attribute: each paragraph of a list carries the list type and the attributes of its bullet or number, including its level. Three properties set them in code, and a built-in dialog box lets users set them.
What follows explains how list types and list attributes work together, then creates bulleted, numbered and structured lists in Visual Basic 6, changes the list level and removes lists. The code comes from the Bullets and Numbering menu of the TXWords sample.
How Lists Work
- The list type. ListType returns or sets the list type of the selected paragraphs:
txListNone(1) for no list,txListBulleted(2),txListNumbered(4) ortxListStructured(8). When the selection contains paragraphs of different lists, it returns a combination of these values. - The attributes. BulletAttribute and NumberingAttribute set the bullet character, the number format, the level, the positions and more. Each takes the attribute to change as a parameter, for example
NumberingAttribute(txNumberingFormat). - The order. An attribute you set has an effect only when
ListTypeis set the next time. Set the attributes first and the list type last. - The levels. Lists have up to 10 levels. The topmost level has the number 1.
All three properties are available at run time only. Positions are in twips, 1/1440 inch; Text Formatting and Views explains the unit.
Let Users Format Lists
A connected TXButtonBar has buttons for bulleted, numbered and structured lists, whose positions PosListBulleted, PosListNumbered and PosListStructured set. Button Bar, Ruler Bar and Status Bar describes the button bar.
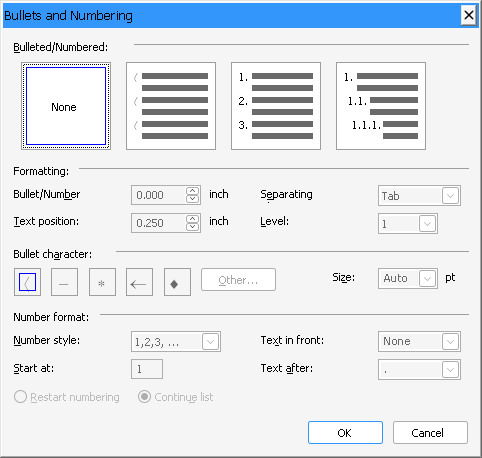
The ListAttrDialog method opens the built-in Bullets and Numbering dialog box. In it, the user chooses bullets or numbers and sets the bullet and text positions, the separating character, the level, the bullet character and its size, the number style, the start number, the text in front of and after the number and whether the numbering restarts or continues. TXWords opens it from Format > Bullets and Numbering > Properties...:
' Call bullets dialog
Private Sub mnuFormat_BulletsAndNumbering_Attributes_Click()
    TXTextControl1.ListAttrDialog
End Sub
The changes apply to the selected text. ListAttrDialog returns True when the user has changed one or more attributes and False when nothing has changed.
Create a Bulleted List
The Bullets item of the TXWords menu turns the selected paragraphs into a bulleted list, or back into normal paragraphs when the item is checked:
Private Sub mnuFormat_BulletsAndNumbering_Bullets_Click()
    If mnuFormat_BulletsAndNumbering_Bullets.Checked Then
        TXTextControl1.ListType = txListNone
    Else
        TXTextControl1.ListType = txListBulleted
    End If
End Sub
To use a bullet character of your own, set it before the list type:
With TXTextControl1
    .BulletAttribute(txBulletFont) = "Arial"
    .BulletAttribute(txBulletChar) = &H2022
    .BulletAttribute(txBulletFormatChar) = 9
    .ListType = txListBulleted
End With
The code works as follows:
txBulletFontsets the font of the bullet character, andtxBulletCharits Unicode character code. &H2022 is the bullet character.txBulletFormatCharsets the gap between the bullet and the text: 9 places the text at the next tab, 32 separates it with a space and 0 lets it follow the bullet directly.- Setting
ListTypelast makes the new attributes take effect.
txBulletPos and txBulletTextPos set the positions of the bullet and of the text in twips, and txBulletSize sets the size of the bullet character. With a txBulletSize of -1, the bullet has the font size of the text that follows it. The bullet font and bullet characters outside the Windows Symbol font are available since version 23.0.
Create a Numbered List
The TXWords menu has an item for each number format. The items form a control array whose Index is the format code, so one procedure handles all of them:
' Select symbol for numbered lists
Private Sub mnuFormat_BulletsAndNumbering_Symbols_Click(Index As Integer)
    If mnuFormat_BulletsAndNumbering_Symbols(Index).Checked Then
        TXTextControl1.ListType = txListNone
    Else
        TXTextControl1.NumberingAttribute(txNumberingFormat) = Index
        TXTextControl1.ListType = txListNumbered
    End If
End Sub
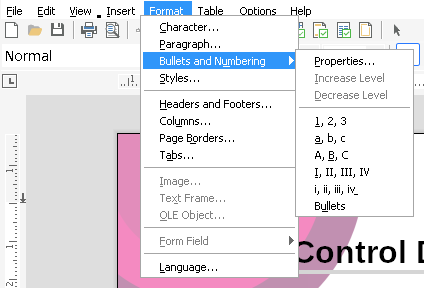
The code sets the number format with txNumberingFormat and then the list type. These are the format codes:
| Code | Numbers | TXWords menu item |
|---|---|---|
| 3 | Arabic numbers | 1, 2, 3 |
| 4 | Small letters | a, b, c |
| 5 | Capital letters | A, B, C |
| 6 | Roman numbers | I, II, III, IV |
| 7 | Small Roman numbers | i, ii, iii, iv |
Add Text Around the Numbers
txNumberingPreText and txNumberingPostText set up to 20 characters in front of and behind each number, and txNumberingStart sets the first number. The following code creates a list that counts Step 1:, Step 2: and so on:
With TXTextControl1
    .NumberingAttribute(txNumberingFormat) = 3
    .NumberingAttribute(txNumberingPreText) = "Step "
    .NumberingAttribute(txNumberingPostText) = ":"
    .NumberingAttribute(txNumberingStart) = 1
    .ListType = txListNumbered
End With
The older attributes txNumberingPreChar and txNumberingPostChar allow a single character only. They are obsolete; use the text attributes instead.
txNumberingPos and txNumberingTextPos set the positions of the number and of the text in twips, and txNumberingFormatChar sets the gap after the number with the same codes as txBulletFormatChar.
Restart or Continue the Numbering
For a paragraph of a numbered list, the txNumberingReStart attribute begins a new list, which starts with the number that txNumberingStart gives, and txNumberingContinue continues the list. In the Bullets and Numbering dialog box, the user chooses Restart numbering or Continue list.
Create a Structured List
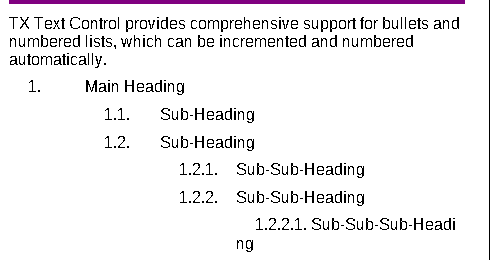
A structured list shows, for each level, its own number together with the numbers of the higher levels. The text in front of and behind the numbers is shown for all higher levels as well. Set ListType to txListStructured to create one:
TXTextControl1.NumberingAttribute(txNumberingFormat) = 3
TXTextControl1.ListType = txListStructured
A structured list uses the attributes of NumberingAttribute. Structured lists are available since version 15.0, as Version 15.0 lists.
Change the List Level
The Increase Level item of the TXWords menu raises the level of the selected list paragraphs by one:
' Increase list indent level
Private Sub mnuFormat_BulletsAndNumbering_IncreaseLevel_Click()
    With TXTextControl1
        If .ListType = txListBulleted Then
            .BulletAttribute(txBulletLevel) = .BulletAttribute(txBulletLevel) + 1
        ElseIf (.ListType = txListNumbered) Or (.ListType = txListStructured) Then
            .NumberingAttribute(txNumberingLevel) = .NumberingAttribute(txNumberingLevel) + 1
        End If
        .ListType = .ListType
        .IncreaseIndent
    End With
End Sub
The code works as follows:
- For a bulleted list, it raises
txBulletLevel. For a numbered or structured list, it raisestxNumberingLevel. .ListType = .ListTypesets the list type again, which makes the new level take effect.- IncreaseIndent moves the left indent of the paragraphs to the next indent position.
The Decrease Level item does the same with - 1 and DecreaseIndent. TXWords enables it only when the level is 2 or higher.
Remove a List
Set ListType to txListNone to turn list paragraphs back into normal paragraphs:
TXTextControl1.ListType = txListNone
Use Lists in Styles
The Style object has the properties ListType, BulletAttribute and NumberingAttribute with the same values, so a paragraph-based style can carry a list. Its bullet and numbering attributes have an effect only when the style's ListType has been set to a matching list type. In the style dialog box, the Numbering... button sets them. Stylesheets describes styles.
Key Members
| Member | Description |
|---|---|
| ListType | Sets the list type of the selected paragraphs: none, bulleted, numbered or structured. |
| BulletAttribute | Sets the bullet character, its font and size, the level and the positions of bulleted lists. |
| NumberingAttribute | Sets the number format, the start number, the text around the numbers, the level and the positions of numbered lists. |
| ListAttrDialog | Opens the built-in Bullets and Numbering dialog box. |
| IncreaseIndent, DecreaseIndent | Move the left indent of the selected paragraphs to the next or previous position. |
The programming category Bullets and Numbered Lists lists all members for lists.