
IIS
Internet Information Services (IIS) hosts an ASP.NET Core application through the ASP.NET Core Module: by default, the application runs inside the worker process of its application pool. With TX Text Control .NET Server, that worker process also starts the Document Editor backend, so the settings of the application pool decide whether the backend runs, how long editing sessions last and whether two processes compete for the same port.
The steps below publish an application with document processing, the Document Editor and the Document Viewer to IIS on Windows Server, following Microsoft's guide Host ASP.NET Core on Windows with IIS and adding what TX Text Control needs.
Prerequisites
- Windows Server 2019, 2022 or 2025. These are the Windows Server versions the requirements documentation lists for deployment.
- An ASP.NET Core application with TX Text Control, for example the application of Document Editor: ASP.NET Core. The commands use a .NET 10 project named MyApp.
- A runtime license for the server. See Runtime Licenses.
What Runs in IIS
Browser
    |  HTTP and WebSocket
    v
IIS with the ASP.NET Core Module
    |
    v
w3wp.exe, the worker process of the application pool, running your application
    |  TCP, port 4283
    v
dotnet.exe TXTextControl.Web.Server.Core.dll, started by DocumentEditorWorkerManager
    |
    v
One worker process for each open editor
With the default in-process hosting, your application runs in w3wp.exe. The hosted service DocumentEditorWorkerManager locates the 64-bit dotnet runtime on the machine and starts the backend with it, as a child process under the identity of the application pool. When the worker process ends, for example after an idle timeout or a recycle, the backend and all open editing sessions end with it.
Prepare the Server
Install IIS with the WebSocket Protocol. In Server Manager, open the Add Roles and Features wizard and select the Web Server (IIS) role. In the Role services step, expand Web Server and Application Development and select WebSocket Protocol. Without it, the Document Editor can't connect. Host the Connection describes the same feature on Windows desktop systems.
Install the .NET Hosting Bundle after IIS. It installs the .NET Runtime and the ASP.NET Core Module. If the bundle was installed before IIS, run its installer again to repair it. Don't install it with the option
OPT_NO_RUNTIME=1: the Document Editor backend needs the shared 64-bit .NET runtime, even when your application is published self-contained.Install the Microsoft Visual C++ Redistributable for Visual Studio 2017, 2019 and 2022 in its x64 version, which TX Text Control requires.
Restart IIS from an elevated command prompt, so that the worker processes find the
dotnetcommand:net stop was /y net start w3svc
Publish the Application
Publish the application for 64-bit Windows on your development machine:
dotnet publish -c Release -r win-x64 --self-contained false
The output in bin\Release\net10.0\win-x64\publish contains your application, a generated web.config for the ASP.NET Core Module, the TX Text Control assemblies with their native Windows libraries, the Fonts folder of the Core engine and the files of the Document Editor backend. Keep the web.config file: without it, IIS may serve files such as MyApp.runtimeconfig.json to the public.
Publish From Visual Studio
Visual Studio creates the same output with a folder publish profile. The NuGet packages copy the TX Text Control files into it:
In Solution Explorer, right-click the project and choose Publish.
Select Folder as the target and click Next.
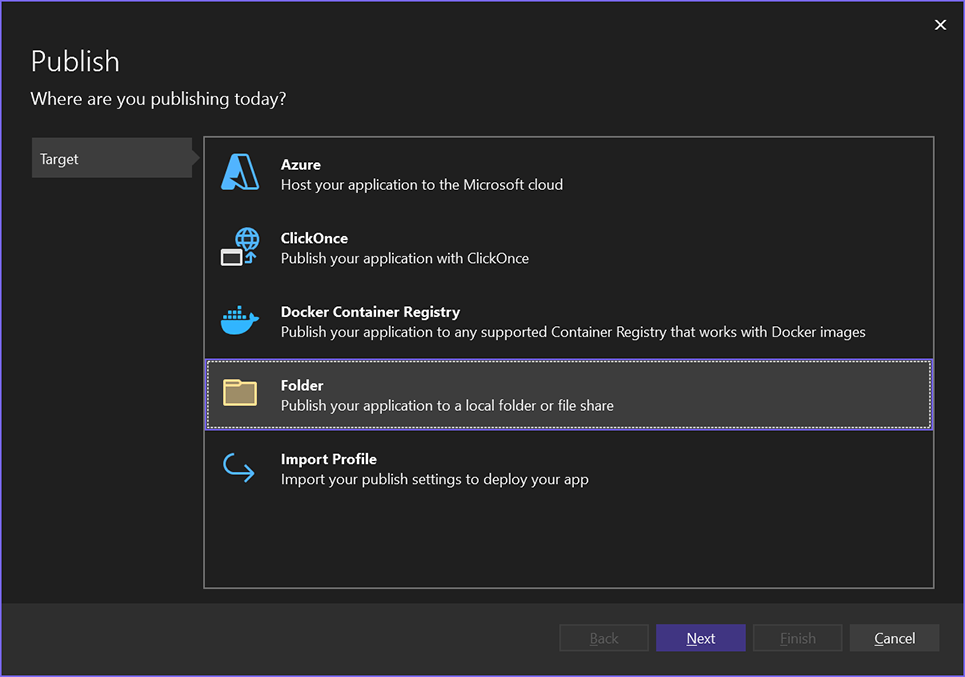
Select Folder again as the specific target, confirm with Next, choose the folder location and click Finish. Visual Studio creates the profile FolderProfile.pubxml.
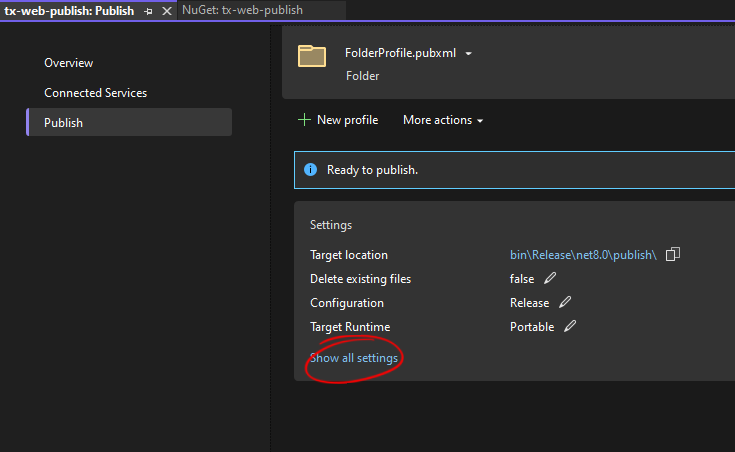
In the summary of the profile, click Show all settings.
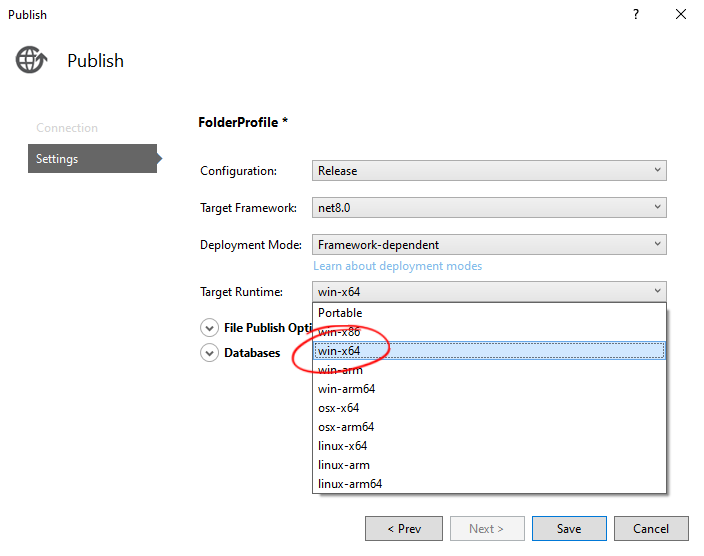
Set Target Runtime to win-x64, keep Deployment Mode at Framework-dependent and click Save.
Click Publish. The selected folder then contains the published application with all TX Text Control files.
A web project copies .config files from its folder into the output. Don't keep a nuget.config with the credentials of the Text Control Private NuGet Feed in the project folder; keep it in the folder above.
Create the Site and the Application Pool
Copy the output to a folder on the server, for example C:\sites\MyApp.
Add the site. In IIS Manager, right-click Sites, select Add Website, enter MyApp as Site name, set Physical path to C:\sites\MyApp and enter the Binding with the host name of the site. Don't use top-level wildcard bindings such as
http://*:80/. IIS creates an application pool with the name of the site.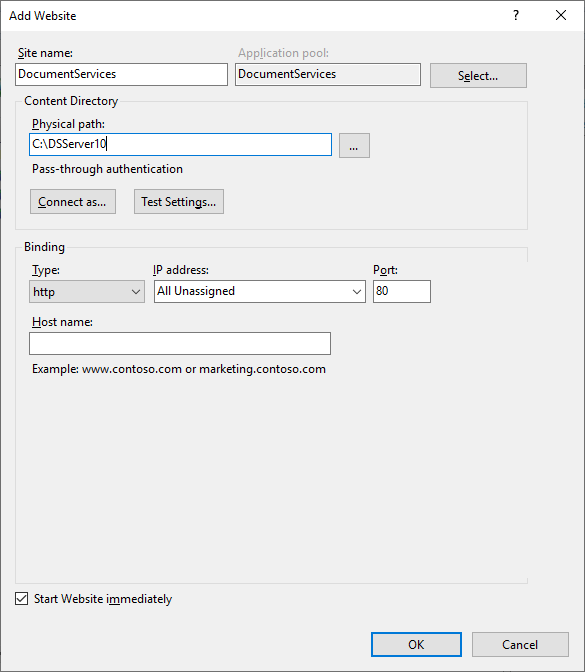
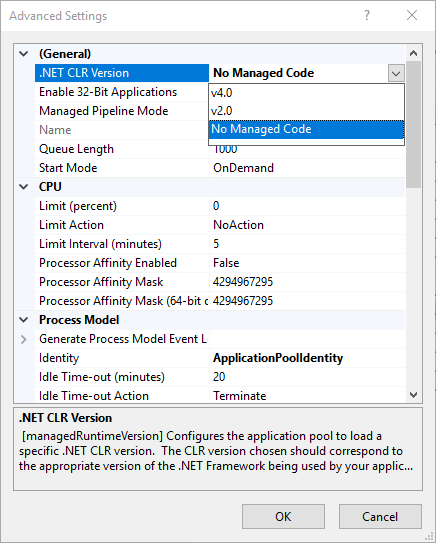
Set the .NET CLR version. Under Application Pools, right-click MyApp, select Basic Settings and set .NET CLR version to No Managed Code.
Keep the application pool 64-bit. In the Advanced Settings of the pool, Enable 32-Bit Applications must be
False, which is the default. The Core engine contains native libraries for 64-bit Windows only, and the Document Editor backend refuses to start in a 32-bit process.Grant access to the folder. The application pool runs as
IIS AppPool\MyAppand needs read and execute permissions:ICACLS C:\sites\MyApp /grant "IIS AppPool\MyApp:(OI)(CI)RX"
Keep the Document Editor Backend Running
The default settings of an application pool end its worker process when nobody uses the site and start a new one at regular intervals. For an application with the Document Editor, each end also ends the backend and all open editing sessions. Change these settings in the Advanced Settings of the application pool, which IIS Manager opens from the Actions pane when the pool is selected under Application Pools:
| Setting | Default | For the Document Editor |
|---|---|---|
| Idle Time-out (minutes) | 20 | 0, so that the worker process doesn't end during periods without requests. The setting applies to in-process hosting. |
| Start Mode | OnDemand | AlwaysRunning, together with Preload Enabled set to True in the Advanced Settings of the site. The application and its backend then start with the pool instead of with the first request. This requires the IIS role service Application Initialization. |
Avoid Overlapping Worker Processes
When IIS recycles an application pool, it starts the new worker process while the old one is still shutting down. Both run your application, and both start a backend on the same port. The backend of the new process can't listen on the port that the old one still uses, and it ends. Until the old process exits, the editors of the new process are served by the old backend; afterward, no backend is left, and the editors fail with "Could not connect to TextControl TCP server".
Set the attribute disallowOverlappingRotation of the pool's recycling settings to true. Microsoft recommends this value for worker processes that load application code that doesn't support multiple worker processes. For the same reason, keep the number of worker processes of the pool, the attribute maxProcesses, at its default value of 1.
Run Several Applications on One Server
Each application with the Document Editor starts its own backend, and without configuration all of them use port 4283. Give each application its own port with DocumentEditorWorkerOptions in appsettings.json and pass the same port to UseTXWebSocketMiddleware, as Configure the Backend Process shows.
Host the Application as a Sub-Application
IIS virtual directories aren't supported for ASP.NET Core applications; host the application as a sub-application instead. Create a separate application pool with No Managed Code for it, add the folder under the root site, select Convert to Application and assign the pool. In-process hosting requires the separate pool.
In a sub-application, the address of the WebSocket handler includes the folder of the application. Set APIRoute in the view as described in Host the Application in a Subfolder.
Fonts With the Classic Engine
The Core engine takes its fonts from the published Fonts folder, so IIS servers need no fonts for it. The Classic engine in TXTextControl.TextControl.ASP.SDK uses the fonts installed on Windows, and newer systems such as Windows Server 2025 often don't come with a full set of fonts. Install the fonts your documents use on the server.
Verify the Deployment
- Browse to the site. The page with the Document Editor shows the editor with its ribbon.
- If the site answers with the error 500.30, the application ended during startup. Turn on the stdout log of the ASP.NET Core Module to read the reason, as Read the Log of the Application describes; The Site Answers With Error 500.30 explains the messages of a 32-bit application pool and a missing .NET runtime.
- If the page loads but the editor doesn't, open the console of the browser's developer tools. A WebSocket connection to /api/TXWebSocket that fails points to a missing WebSocket Protocol feature.
Troubleshooting IIS collects further problems.
Applications on the .NET Framework
ASP.NET applications on the .NET Framework use the Classic engine from the Windows setup. The requirements list IIS 7.0 or later, and for the Document Editor IIS 8.0 or later with the WebSocket Protocol. Their Document Editor backend is still the TX TextControl Service, a Windows service that you install on the server with txregwebsvr.exe, not a process that the application starts. .NET Framework Applications describes how to deploy them, and ASP.NET on .NET Framework how to build them.
Next Steps
- Windows Service: run an application without IIS.
- WebSocket Architecture: the connection of the Document Editor in detail.
- Document Editor Architecture: the backend process and its configuration.
- Azure App Service Windows: host the application in Azure instead.