
React
The DocumentEditor component from the @txtextcontrol/tx-react-document-editor npm package shows the Document Editor in a React application, while an ASP.NET Core backend hosts the Document Editor backend. Once both are running, you load a document with the JavaScript API as soon as the editor is ready.
Prerequisites
- Visual Studio 2026 with the .NET 10 SDK for the backend. The engine and backend packages require .NET 8 or higher.
- A TX Text Control .NET Server license with a serial number assigned to your email address, and access to the Text Control Private NuGet Feed.
- Node.js and npm.
How the Projects Work Together
The React component only contains the user interface of the editor. It opens a WebSocket connection to your ASP.NET Core backend, which runs the Document Editor backend and synchronizes the document. The component's webSocketURL property contains the address of that connection.
Create the Backend
The backend is an ASP.NET Core Web API project with the packages TXTextControl.Web, TXTextControl.TextControl.Core.SDK and TXTextControl.Web.DocumentEditor.Backend, whose Program.cs starts the Document Editor backend and adds the WebSocket middleware. Create it, configure it and start it as described in Create the Backend in the Angular tutorial, and note the HTTPS address of the project in Properties/launchSettings.json, for example https://localhost:7066.
The WebSocket URL for the React component is this address with the wss protocol and the path /api/TXWebSocket, for example wss://localhost:7066/api/TXWebSocket. Use wss when the backend runs on HTTPS and ws when it runs on HTTP.
Create the React Application
Open a command prompt and create a new React application with Vite:
npm create vite@latest my-tx-document-editor-appSelect React as the framework and JavaScript as the language.
Change to the new folder:
cd my-tx-document-editor-appInstall the Document Editor package:
npm i @txtextcontrol/tx-react-document-editor
Add the Editor Component
Open src/App.jsx, replace its complete content with the following code and save the file. Replace the port 7066 with the HTTPS port of your backend.
import DocumentEditorPackage from '@txtextcontrol/tx-react-document-editor';

const DocumentEditor = DocumentEditorPackage.default ?? DocumentEditorPackage;

function App() {
  return (
    <DocumentEditor
      style={{ width: "1280px", height: "1024px" }}
      webSocketURL="wss://localhost:7066/api/TXWebSocket"
      editMode="Edit">
    </DocumentEditor>
  );
}

export default App;
The package is a CommonJS module, and since Vite 8 its default import returns the module object instead of the component, so the code takes the component from the default property; with ??, it also works with earlier Vite versions. Import the Components in Vite 8 explains the change and the error a plain default import causes.
The component supports these properties:
| Property | Type | Description |
|---|---|---|
style | object | The width and height of the editor in pixels (px) or as a percentage (%) of the container. |
webSocketURL | string | The WebSocket URL of your backend. |
editMode | string | Whether the text is editable, selectable or read-only: 'Edit', 'ReadAndSelect', 'ReadOnly' or 'UsePassword'. |
contextMenusEnabled | boolean | Whether a right-click opens a context menu. |
formattingPrinter | string | The name of a printer whose text dimensions and capabilities are used to format the document. |
culture | string | The culture that formats values such as date and time strings, for example 'de-DE'. |
uiCulture | string | The user interface culture that selects the language of the string resources, for example 'en-US'. |
userNames | string[] | The names of users who have access to editable regions. |
reconnectTimeout | number | The time in seconds before reconnection attempts stop after a connection loss. |
onLoad | function | A function that runs as soon as the global TXTextControl object is loaded. |
Run the Application
Make sure the backend is running in Visual Studio.
In the command prompt, start the React application:
npm run devOpen
http://localhost:5173in your browser. The page shows the Document Editor with its ribbon bar.
The React tutorial on the Text Control blog creates the application with Create React App instead of Vite. The component is used the same way there, in src/App.js, and the application starts with npm start.
Load a Document With the JavaScript API
Use the onLoad property to run code when the global TXTextControl object exists. Inside it, wait for the editor's textControlLoaded event before you call the API. Replace the content of src/App.jsx with the following code:
import DocumentEditorPackage from '@txtextcontrol/tx-react-document-editor';

const DocumentEditor = DocumentEditorPackage.default ?? DocumentEditorPackage;

function App() {

  function handleLoad() {
    // wait until the editor is ready
    TXTextControl.addEventListener("textControlLoaded", function () {
      TXTextControl.loadDocument(
        TXTextControl.StreamType.HTMLFormat,
        btoa("<p>Welcome to <strong>Text Control</strong></p>"));
    });
  }

  return (
    <DocumentEditor
      style={{ width: "1280px", height: "1024px" }}
      webSocketURL="wss://localhost:7066/api/TXWebSocket"
      editMode="Edit"
      onLoad={handleLoad}>
    </DocumentEditor>
  );
}

export default App;
loadDocument replaces the content of the editor and expects the document as a base64-encoded string. For text with characters outside the Latin-1 range, encode it with TXTextControl.btoaUTF8 instead of btoa.
With the Vite template's default styles in src/index.css, the page shows the editor like this:
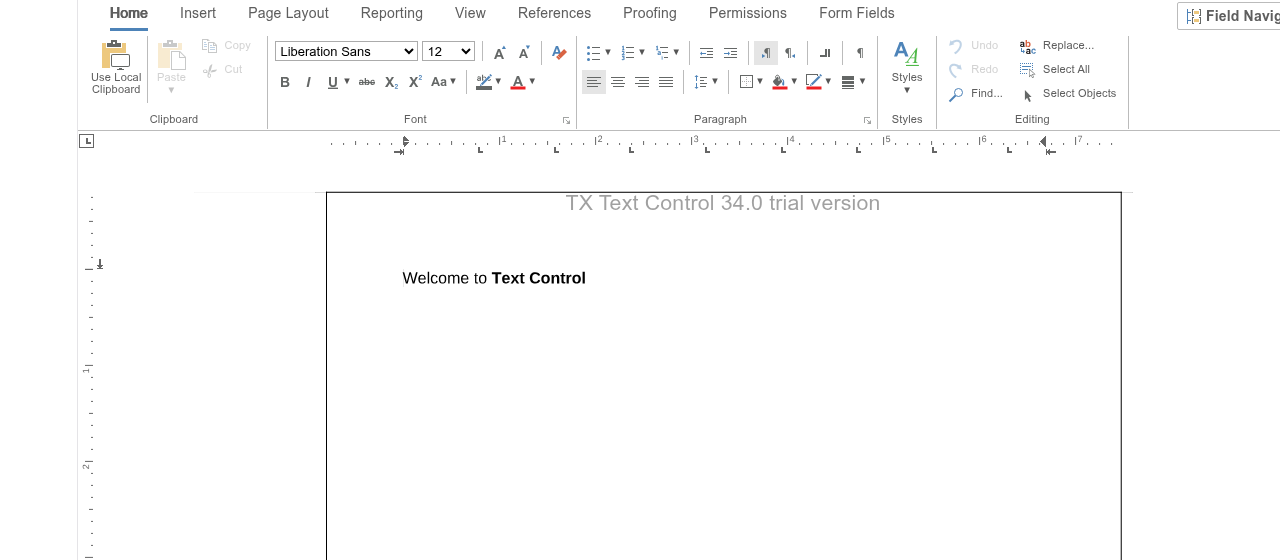
The header "TX Text Control 34.0 trial version" comes from the trial packages the screenshot was taken with; see Trial and Licensed Packages.
Use One Visual Studio Solution Instead
You can also keep the backend and the React application in one solution with the React and ASP.NET Core project template of Visual Studio. The template creates a project that ends with .Server and a project that ends with .client.
- In the .Server project, install the three NuGet packages listed above.
- In Program.cs of the .Server project, add the two
usingdirectives, theAddHostedService<DocumentEditorWorkerManager>()call and the calls toUseWebSockets()andUseTXWebSocketMiddleware()shown in the backend step. - In the .client project, install the npm package. In Solution Explorer, right-click npm in the .client project, choose Install new npm packages and install
@txtextcontrol/tx-react-document-editor. - Replace the content of src/App.jsx in the .client project with the component code above. Use the port of the .Server project, which you find in its launchSettings.json file.
- In launchSettings.json of the .Server project, set
launchUrlto an empty string. - Build and start the solution.
Next Steps
- Loading and Saving Documents — load documents into the editor and save them to your backend.
- JavaScript API — program the document in the editor from JavaScript.
- WebSocket Security — protect the WebSocket connection between the editor and the backend.
- React Integration Guide — go further with the React component in your application.