
Digital Signatures
In contract, approval or onboarding processes, users sign documents in the browser with the Document Viewer. Your application runs the signing process: it starts the process with signature settings, receives the signed document on the server and applies a certificate to it.
The examples extend the application of Loading Documents, whose DocumentController returns documents from the App_Data folder. The document needs a signature field named txsign, which you insert in the Document Editor as described in Signature Fields. Save it as contract.docx in App_Data.
How Signing Works
- Load with signature settings. Your code loads the document together with signature settings. They name the signature fields that users sign, the names shown to the user and the URL of an endpoint in your application.
- Sign. The viewer shows a signature bar and turns the named signature fields into signature boxes. Users click a box and create their signature in a dialog: they draw it with the mouse or a finger, type their name in a font, or upload an image.
- Submit. When users submit the document, the backend of the viewer merges the signature images and the values of form fields into the document.
- Process on the server. The backend of the viewer then posts the signed document and the signature data on to your endpoint: the request comes from the viewer's
TextControlcontroller in your application, not from the browser. There, your code can apply a certificate to each signature field and save a digitally signed PDF document. - Return a result. What your endpoint returns is passed to a callback in the browser, for example to offer the signed PDF document for download.
Electronic signatures are the images that users create in the viewer. A digital signature additionally applies a certificate to the document; Digitally Sign a PDF explains certificates.
Start the Signing Process
The following view renders the viewer without a document, loads contract.docx from the DocumentController with signature settings and downloads the signed PDF document that the endpoint returns. Replace the content of Views/Home/Index.cshtml:
@using TXTextControl.Web.MVC.DocumentViewer

<div style="width: 800px; height: 600px;">

@Html.TXTextControl().DocumentViewer(settings => {
    settings.Dock = DocumentViewerSettings.DockStyle.Fill;
}).Render()

</div>

<script>
    window.addEventListener("documentViewerLoaded", async function () {
        TXDocumentViewer.addEventListener("signaturesCompleted", function () {
            console.log("All signature boxes are signed.");
        });

        // Receives the string that SignatureController.SignDocument returns
        TXDocumentViewer.signatures.setSubmitCallback(function (result) {
            var link = document.createElement("a");
            link.href = "data:application/pdf;base64," + result;
            link.download = "signed.pdf";
            document.body.appendChild(link);
            link.click();
        });

        const response = await fetch("/Document/Load?name=contract.docx");
        const stored = await response.json();

        await TXDocumentViewer.loadDocument(stored.data, stored.name, {
            showSignatureBar: true,
            ownerName: "Paul Paulsen",
            signerName: "Tim Typer",
            signerInitials: "TT",
            uniqueId: "12345-ABCDE",
            redirectUrlAfterSignature: window.location.origin + "/Signature/SignDocument",
            signatureBoxes: [ { name: "txsign", signingRequired: true, style: 0 } ]
        });
    });
</script>
The code works as follows:
- loadDocument takes a SignatureSettings object as its third parameter, which starts the signing process for this document.
- signatureBoxes lists the signature fields that users sign. Signature Fields describes the boxes.
- setSubmitCallback registers the function that is called when the document has been submitted. It receives the string that your endpoint returns, here the signed PDF document as base64-encoded data.
- The
signaturesCompletedevent is raised when the user has signed all signature boxes.
The signature settings have these properties:
| Property | Sets |
|---|---|
| showSignatureBar | Whether the signature bar with an introductory text is shown at the top of the viewer |
| ownerName | The name of the person who requests the signature, shown in the signature bar |
| signerName, signerInitials | The name and initials of the signer, shown in the signature dialog |
| uniqueId | A unique ID of the document, such as an envelope ID, included in the representation of the signature |
| redirectUrlAfterSignature | The URL of the endpoint that receives the signed document |
| signatureBoxes | The signature fields that users sign |
| defaultSignatureFont | The font preselected for typed signatures, for example { family: "Pacifico" } |
| customSigning | Whether your code handles the signing on the server; see "Custom Signing" below |
The older signatureBoxName is obsolete; use signatureBoxes. In the ASP.NET Core view, the same settings are available as DocumentViewerSettings.SignatureSettings with a .NET SignatureSettings object, and in Angular and React as the signatureSettings property.
Receive and Sign the Document on the Server
The viewer's TextControl controller posts a SignatureData object to the URL of redirectUrlAfterSignature. The following controller loads the signed document, applies a certificate to each signature box and returns the PDF document. Create Controllers/SignatureController.cs, and put a certificate file certificate.pfx with the password 123 into App_Data, as created in Digitally Sign a PDF:
using System.Security.Cryptography.X509Certificates;
using Microsoft.AspNetCore.Mvc;
using TXTextControl;
using TXTextControl.Web.MVC.DocumentViewer;
using TXTextControl.Web.MVC.DocumentViewer.Models;
public class SignatureController : Controller
{
[]
public string SignDocument([FromBody] SignatureData data)
{
X509Certificate2 certificate = X509CertificateLoader.LoadPkcs12FromFile(
"App_Data/certificate.pfx", "123", X509KeyStorageFlags.Exportable);
// One certificate for each signature box of this signing process
List<DigitalSignature> signatures = new List<DigitalSignature>();
foreach (SignatureBox box in data.SignatureBoxes)
{
signatures.Add(new DigitalSignature(certificate, null, box.Name));
}
byte[] pdf;
using (ServerTextControl tx = new ServerTextControl())
{
tx.Create();
// The signed document arrives base64-encoded in the TX Text Control format
tx.Load(Convert.FromBase64String(data.SignedDocument.Document),
BinaryStreamType.InternalUnicodeFormat);
SaveSettings saveSettings = new SaveSettings()
{
SignatureFields = signatures.ToArray()
};
tx.Save(out pdf, BinaryStreamType.AdobePDF, saveSettings);
}
// Passed as a string to the setSubmitCallback function
return Convert.ToBase64String(pdf);
}
}
The code works as follows:
[FromBody]binds the posted data toSignatureData. SignatureBoxes contains the signature boxes of the process, and SignedDocument the document with the signatures merged in.- A DigitalSignature associates the certificate with the signature field of the given name.
- ServerTextControl.Load loads the Document of the signed document, which is base64-encoded data in the TX Text Control format.
- SaveSettings.SignatureFields takes the digital signatures, and Save writes the signed PDF document.
X509CertificateLoader is available in .NET 9 and later; in a .NET 8 project, load the certificate with new X509Certificate2("App_Data/certificate.pfx", "123", X509KeyStorageFlags.Exportable).
Run the application, click the signature box, create a signature and submit the document: the browser downloads signed.pdf, whose signature field is digitally signed.
SignatureData also contains the signature image as base64-encoded data in SignatureImage, the values of the form fields in FormFields and the ID of the document in UniqueId. The endpoint can be part of another application, and values in the query string of its URL reach the action as parameters, for example an ID of the signer.
What Users See
The signer goes through these steps in the viewer, shown here with the settings of the view above:
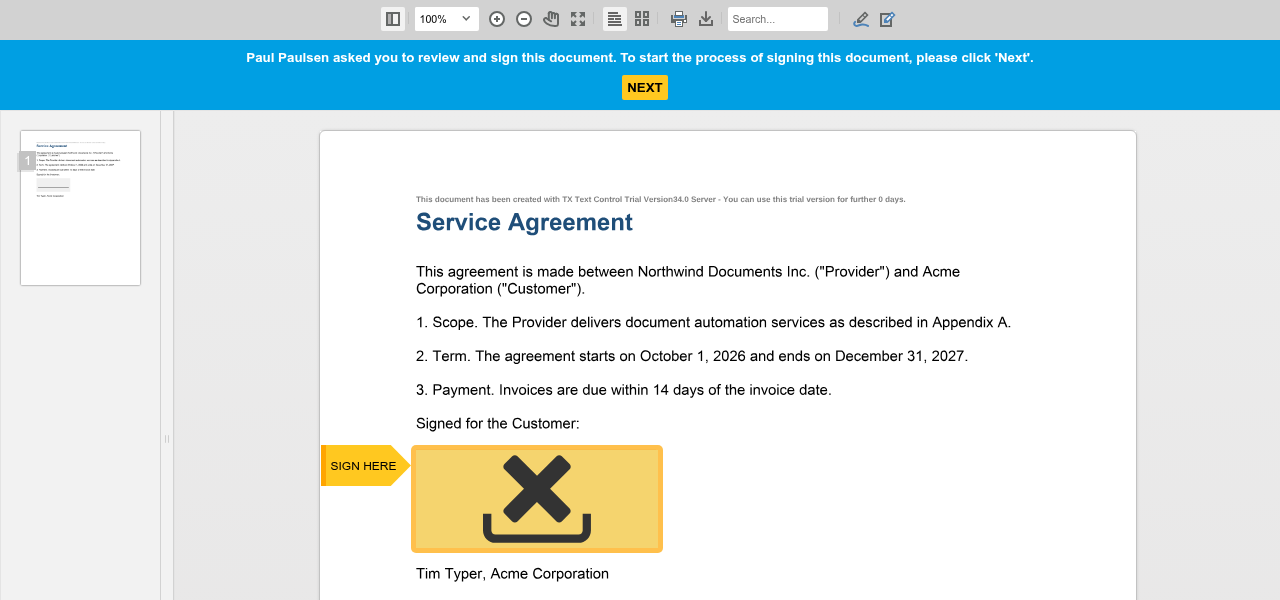
The signature bar asks the signer to review and sign the document, and a SIGN HERE marker points to each signature box:
NEXT or a click on a signature box opens the Setup your Signature dialog with the signer's name and initials from the settings. The buttons above the signature pad switch between drawing, typing and uploading an image, and SETUP AND SIGN is available once there is a signature:
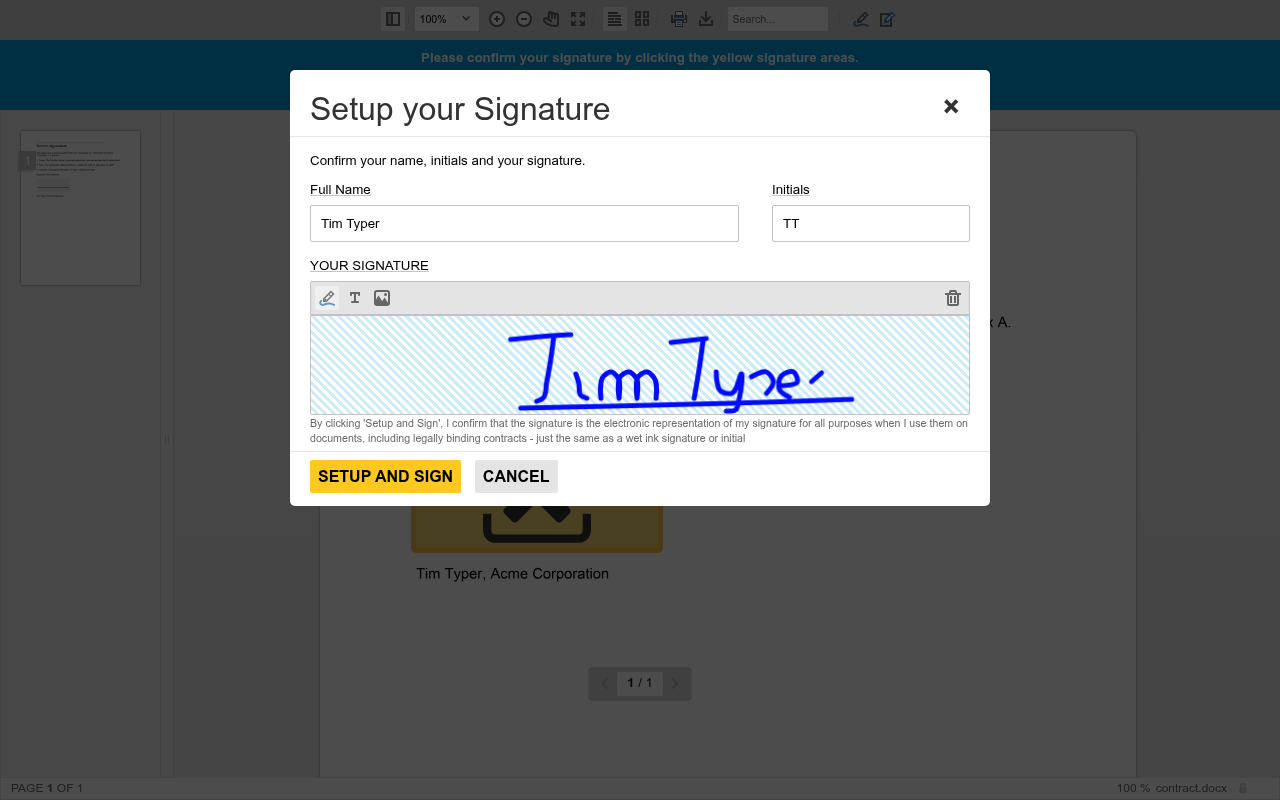
The bar asks the signer to confirm the signature by clicking the yellow signature areas. Each click puts the signature into a box.
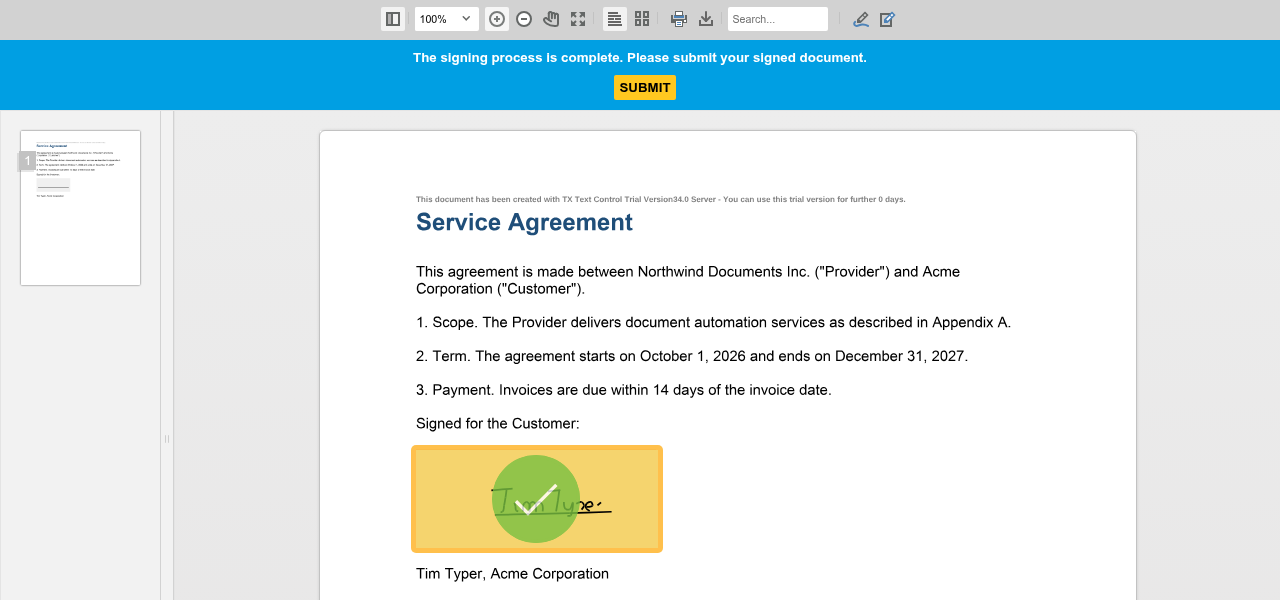
When all boxes are signed, the bar says that the signing process is complete, and SUBMIT sends the document to the backend:
- The signature bar at the top of the viewer shows the owner's name while the signing process is active.
- The signature dialog opens when users click a signature box. Since version 32.1.1 of the Document Viewer package, it offers three ways to create a signature: draw it, type the name in a font of their choice or upload an image. The fonts that your page loads are offered for typed signatures.
- A stored signature. The browser stores the signatures users create locally, so they can use them again in later sessions. clearSignaturePad clears the signature pad of the dialog.
- Initials boxes are signed with the initials the user enters in the dialog.
Control the Signing Process
The Signatures object, TXDocumentViewer.signatures, has these methods:
| Method | Does |
|---|---|
| startSigningProcess | Starts the signing process and opens the signature dialog |
| cancelSigningProcess | Cancels the setup of the signature and closes the dialog |
| submit | Submits the signed document |
| setSubmitCallback | Sets the function that is called when the document is submitted |
| setBeforeSubmitCallback | Sets the function that is called when the document is being submitted |
| setCustomSigning, getCustomSigning | Turn custom signing on or off and return its state |
| retrieveSignature, clearSignaturePad | Retrieve the signature stored in the browser and clear the signature dialog |
To submit the document as soon as all boxes are signed, call TXDocumentViewer.signatures.submit() in the handler of signaturesCompleted.
Custom Signing
With custom signing, turned on with customSigning: true or setCustomSigning(true), the viewer forwards only the signature data to your endpoint, and your code creates the signed document itself. The endpoint receives the signature image in SignatureData.SignatureImage and the names of the boxes in SignatureBoxes, and can insert the image into the fields of the original document with ServerTextControl. The blog article Electronic Signatures: Document Signing by Routing Requests to Custom Endpoints compares the default and the custom process.
Protect the Endpoint
The endpoint accepts every document that is posted to it, so check that each request belongs to a signing process your application started. A common approach adds a token that your server generated to the query string of redirectUrlAfterSignature and checks it in a filter before the action runs; Protect the Signing Endpoint in Security shows this filter. The blog article How to Add Electronic and Digital Signatures to PDFs in ASP.NET Core C# and Angular builds the complete process with Angular.
Next Steps
- Signature Fields: signature and initials boxes, and documents with several signers.
- Digitally Sign a PDF: certificates, timestamps and verifying signatures.
- Form Fields: let users fill out the document before they sign it.