
JavaScript
A plain HTML page, without a framework or an npm package, is enough to show the Document Editor. The page loads the editor script from your ASP.NET Core backend, initializes the editor with TXTextControl.init(), loads a document and calls the JavaScript API from buttons.
Prerequisites
- Visual Studio 2026 with the .NET 10 SDK for the backend. The engine and backend packages require .NET 8 or higher.
- A TX Text Control .NET Server license with a serial number assigned to your email address, and access to the Text Control Private NuGet Feed.
- A text editor and a web browser.
How the Page Works
The HTML page contains only the frontend. Your ASP.NET Core backend provides everything else:
- The page loads the editor script tx-document-editor.min.js from the backend. The TX Text Control WebSocket middleware serves it at
/api/TXWebSocket/GetResource?name=tx-document-editor.min.js. The script defines the globalTXTextControlobject. TXTextControl.init()creates the editor inside adivelement and opens a WebSocket connection to the backend at/api/TXWebSocket.- The backend runs the Document Editor backend, which synchronizes the document.
Create the Backend
The backend is an ASP.NET Core Web API project with the packages TXTextControl.Web, TXTextControl.TextControl.Core.SDK and TXTextControl.Web.DocumentEditor.Backend, whose Program.cs starts the Document Editor backend and adds the WebSocket middleware. Create it, configure it and start it as described in Create the Backend in the Angular tutorial, and note the HTTPS address of the project in Properties/launchSettings.json, for example https://localhost:7118.
Create the HTML Page
Create a new file named index.html with the following content. Replace the port 7118 in both URLs with the HTTPS port of your backend.
<html>
<head>
<meta charset="utf-8" />
<title>TX Text Control Document Editor from JS</title>
<script
src="https://localhost:7118/api/TXWebSocket/GetResource?name=tx-document-editor.min.js">
</script>
<style>
#txDocumentEditor {
height: 800px;
width: 800px;
}
</style>
</head>
<body>
<div id="txDocumentEditor"></div>
<script>
TXTextControl.init({
containerID: "txDocumentEditor",
webSocketURL: "wss://localhost:7118/api/TXWebSocket"
});
var documentString = "Welcome to <strong>Text Control</strong>";
TXTextControl.addEventListener("textControlLoaded", function () {
TXTextControl.loadDocument(TXTextControl.StreamType.HTMLFormat, btoa(documentString));
});
</script>
</body>
</html>
What the Page Does
- The
scriptelement in theheadloads the editor script from the backend. - The
divwith the IDtxDocumentEditoris the container of the editor. The CSS gives it an explicit width and height. TXTextControl.init()creates the editor.containerIDis the ID of the container, andwebSocketURLis the WebSocket address of the backend. Usewsswhen the backend runs on HTTPS andwswhen it runs on HTTP.TXTextControl.addEventListener()registers a handler for thetextControlLoadedevent. It fires when the editor is initialized and ready to be used programmatically. Call the API only after this event.TXTextControl.loadDocument()replaces the content of the editor. The first parameter is the format, a value of theStreamTypeenumeration. The second parameter is the document as a base64-encoded string. For text with characters outside the Latin-1 range, useTXTextControl.btoaUTF8instead ofbtoa.
Open the Page
- Make sure the backend is running in Visual Studio.
- Save index.html and open it in your web browser.
The page shows the Document Editor with its ribbon bar and the loaded text. You can also serve the page from any web server, as long as both URLs point to your backend.
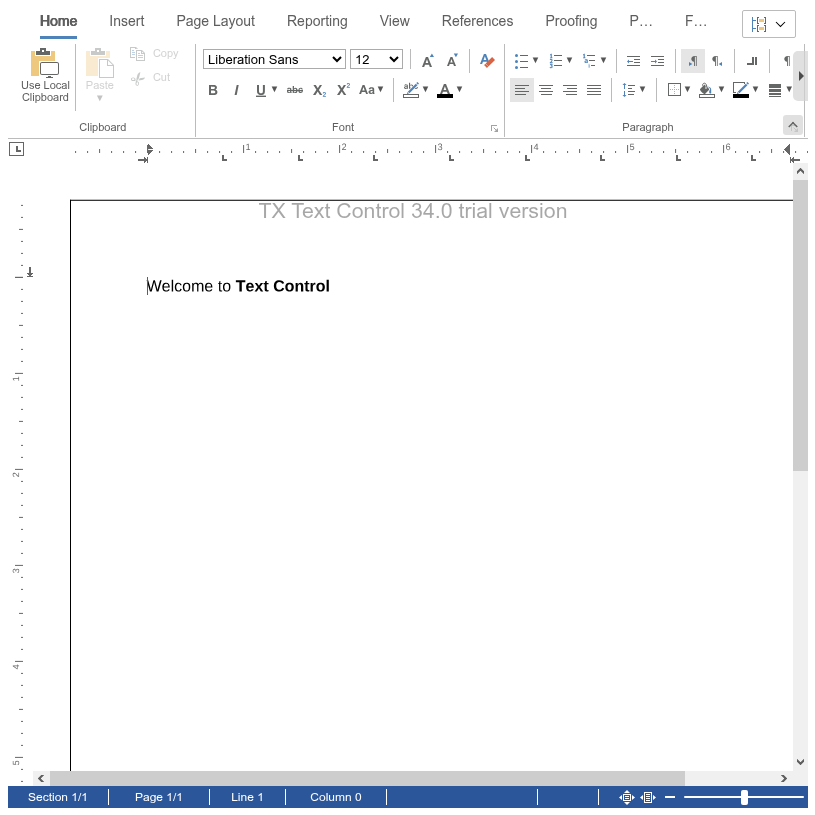
The container is narrower than the ribbon, so the editor shortens the labels of the last tabs and shows the remaining groups after a scroll button. The header "TX Text Control 34.0 trial version" comes from the trial packages the screenshot was taken with; see Trial and Licensed Packages.
Call the JavaScript API From Buttons
Add two buttons below the container div:
<input type="button" onclick="insertTable()" value="Insert Table" />
<input type="button" onclick="saveAsHtml()" value="Save as HTML" />
Then add the two functions at the end of the existing script element, below the event listener:
function insertTable() {
  TXTextControl.tables.add(5, 5, 10, function (e) {
    if (e === true) { // if added
      TXTextControl.tables.getItem(function (table) {
        table.cells.forEach(function (cell) {
          cell.setText("Cell text");
        });
      }, null, 10);
    }
  });
}

function saveAsHtml() {
  TXTextControl.saveDocument(TXTextControl.StreamType.HTMLFormat, function (e) {
    console.log(e.data);
  });
}
insertTable()adds a table with 5 rows, 5 columns and the ID 10 at the current input position withtables.add(). When the callback reports success,tables.getItem()returns the table with this ID, andsetText()fills every cell.saveAsHtml()saves the document withTXTextControl.saveDocument()and writes the result to the browser console. The callback receives aSaveDocumentResultobject. Itsdataproperty contains plain text for text-based formats such as HTML and RTF, and base64-encoded data for binary formats such as DOCX and PDF.
Many functions of the JavaScript API are asynchronous. They pass their results to callback functions, so code that depends on a result runs inside the callback.
Initialization Settings
TXTextControl.init() takes a ComponentSettings object. Besides the container and the WebSocket URL, its editorSettings property sets options such as the user names, the cultures and the reconnect timeout. For example, the following call sets the users who have access to editable regions:
TXTextControl.init({
  containerID: "txDocumentEditor",
  webSocketURL: "wss://localhost:7118/api/TXWebSocket",
  editorSettings: {
    userNames: ["Tim Typer"]
  }
});
Settings of TXTextControl.init lists all settings.
Remove the Editor From the Page
In a single-page application, call TXTextControl.removeFromDom() before you remove the editor or create it again; see Remove the Editor. Create and Remove the Editor at Run Time shows the complete code.
Next Steps
- Loading and Saving Documents — load documents into the editor and save them to your backend.
- JavaScript API — program the document in the editor from JavaScript.
- Events — react to what happens in the editor.
- WebSocket Security — protect the WebSocket connection between the editor and the backend.